Rules to Better AI Development
Do you know the best workflow for AI assisted development?
"Vibe coding" is a trend that has taken the software development world by storm recently. It means developing via a coding agent, and never even looking at - let alone editing - the code. It has also become synonymous with low-quality code 👎.
When writing code as a professional developer, "vibe coding" may make it easy to get a solution up and running without worrying about the details, but as soon as you commit it to the repository under your name, it becomes your responsibility, as if you had written it yourself.
Hence it can be tempting to just "vibe" your way through a few features, but if you do not understand what it does and why, you are going to get into trouble if bugs start popping up.
There is a time and a place for it (e.g. building a rapid prototype, or working with a tight budget). See how SSW empowers non-developers with the tools to start vibe coding.
There are some best practices to follow when doing AI assisted development to avoid problems down the track without missing out on the efficiency gains of AI tools.
Video - AI Assisted Development for Enterprise | Calum Simpson | SSW Rules (13 min)Workflow: Plan → Discuss → Implement → Review
There are likely millions of ways to implement any given feature in a software project. Most of them are going to be bad and should be discarded out of hand... even though they may "work".
There will probably be a handful of good solutions to pick from. Picking the right way to solve the problem given the whole context of the surrounding codebase, project architecture, Product Owner requirements, current or upcoming tech changes, etc. is usually what separates the best developers from the rest.
Even an AI that writes perfect code is going to do a bad job if the code it is trying to write does something that makes no sense in the context of the project. And most AI agents (at least for now) have no way of accessing a lot of that contextual information - especially if it is outside the current repository.
❌ Figure: Bad example - Vibe coding overcooked the solution
Therefore the professional AI Assisted Developer should follow a proper workflow with every feature implemented. Instead of just typing: "Implement my feature XXX", hitting enter, and walking off to brew a coffee, here's the recommended workflow:
1. Plan
Before doing anything, plan what you are doing. Give the AI your requirements and as much related context as possible. If you are using an AI that can search the web, ask it to go have a look for any relevant documentation, best practices, potential pitfalls, code snippets or repos, etc.
Ask it to produce a markdown file containing a detailed step-by-step plan to implement the feature - including which files will be added or created, and what high-level changes will be made in each, and reference URLs. Ask for each step of the plan to be a small self contained unit of work (or as small as possible) to make implementation easier later.
2. Discuss
This is where the professional developer shines. You now have a detailed plan in a markdown file telling you exactly what needs to be done - it is your job to ensure that you not only understand everything it is going to do - but also that what it is proposing makes sense in the wider context of the project.
The file should be a living document, which you can either manually edit as required, or discuss with the AI agent and ask it to edit.
3. Implement
Okay - now that all the planning and discussing is done and your planning document updated - ask the agent to implement the first (or next) step of the plan. Now you can go enjoy that coffee break.
Importantly, the scope of what the agent is working on will be limited by each step being a small self-contained unit of work. It may be wise to instruct your agent to strictly follow the listed instructions and not to do anything extra - depending on how overzealous it is.
4. Review
This is the most important step in AI assisted development. Once you accept a piece of code that the AI suggests to you, it is no longer the AI's responsibility. Your name will be on the commit, so it's your responsibility. Ensure you completely understand everything it has done, as if you were reviewing someone else's pull request. If you have any questions, just ask the agent - you may learn something new or help uncover a bug.
If you have some unit tests, it probably makes sense to run them every time you are reviewing an agent-implemented step. The sooner you catch a bug, the better.
Once the review step is complete and you are happy with the code, you can commit it to your feature branch, update the step-by-step plan to say which steps are done (manually or via the agent), then optionally return to the Plan phase if things have changed, or to the Implement phase if you are ready to proceed straight to the next step.
Tip: Use Cursor Rules to define this and other behavior without having to repeat it every time.
Tip: Use GitHub Copilot to help review the code before you merge it in. Note this does not remove the need for you to understand it, but it may offer an additional perspective.
Do you create custom GPTs?
The advent of GPT and LLMs have sent many industries for a loop. If you've been automating tasks with ChatGPT, how can you share the efficiency with others?
What is a custom GPT?
OpenAI's standard ChatGPT is pretty good at a lot of things, but there are some limitations. Creating a custom GPT means tailoring it for a specific purpose, with custom training data and system prompting. It turns ChatGPT into a ready-made assistant.
If you frequently use the same prompt or series of prompts, it is valuable to make a GPT that knows those instructions permanently.
There are 3 areas where a custom GPT can overcome the limitations of standard ChatGPT:
Retrieval Augmented Generation (RAG)
RAG is the term used to describe additional data your model can access that other models have not (or cannot). Perhaps this is the IP of your company, or simply more up-to-date information on a given topic. If your model has a richer or more refined data set than the competition, it can perform better.
Instructions (System Prompt)
In a GPT you have the ability to define a set of initial instructions. That means you can provide a great initial prompt so users have a high quality prompt even when their prompting skills are low. That means if you're a prompt wizard, you will get better responses than others.
Custom actions
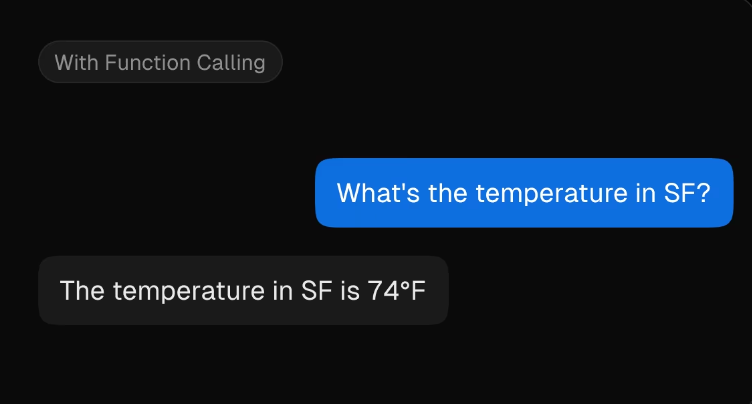
A huge area for innovation is being able to connect your GPT model to your own API, allowing you to take both the user input and perform additional logic before returning a response to the user. Some examples are executing code to test its validity, or looking up a weather forecast for the user's location before suggesting activities that day.
GPT Stores
Stores such as the OpenAI GPT Store and Bind AI let you quickly launch a custom GPT model and make it available (and monetizable) to the world. You can monetize your GPT if it gains enough traction:
✅ Pros
- Fast way to get your custom GPT model live
- Easily test your model's popularity and iterate on market feedback
- Minimal/no infrastructure or maintenance concerns
❌ Cons
- May be difficult to differentiate your model from everybody else's
- Revenue-sharing model may be disadvantageous
Video: the ChatGPT store is about to launch… let's get rich (4 min)Alternative Solution - Bespoke product/service
Building a custom product or service (not on the GPT store) is great if you have the time, energy, and know-how. It can help springboard your startup into the next market unicorn, but requires a much larger time (and dollar) commitment.
✅ Pros
- Complete control over your product (UI, behaviour, pricing, etc.)
- Increased branding and marketability options
- Can become your MVP PaaS/SaaS offering at V1
❌ Cons
- Reliant on SEO to be discovered
- Product $$$ - typically much more expensive to get a V1 out the door
- Infrastructure $$$ - you pay for hosting and maintenance
Takeaways
AI is truly a disruptive technology. There will be many industries that rise and fall on the back of ideas from the public. Be innovative and creative with ChatGPT! Then be sure to come back and give this rule a thumbs up 🙂
Do you know how to train GPT?
GPT is an awesome product that can do a lot out-of-the-box. However, sometimes that out-of-the-box model doesn't do what you need it to do.
test content change in staging
In that case, you need to provide the model with more training data, which can be done in a couple of ways.
Usually, for common scenarios GPT will already be adequate, but for more complex or highly specific use cases it will not have the required training to output what you need.
1. System Prompt
The system prompt is a prompt that is sent along with every request to the API, and is used to tell the model how it should behave.
Using the system prompt is the easiest way to provide additional data to GPT, but there are also some downsides to this approach.
✅ Benefits
- Easy to implement
- No extra setup cost
- Data can be easily changed or removed
❌ Disadvantages
- The system prompt counts towards total token count - not suitable for large amounts of data
- Large system prompts can limit the amount of tokens available for questions and responses
- Adds extra cost to each request
- Potential for inconsistency depending on what data is sent
2. Fine Tuning
OpenAI provides a way for you to train new data into the model so that it is always available, without having to provide it with each request.
For example, if you want to build an app that outputs SSW rules based on a title, the untrained model probably won't know what SSW Rules are so you need to train it.
❌ Figure: Bad example - The untrained GPT model doesn't know what format to create a rule in
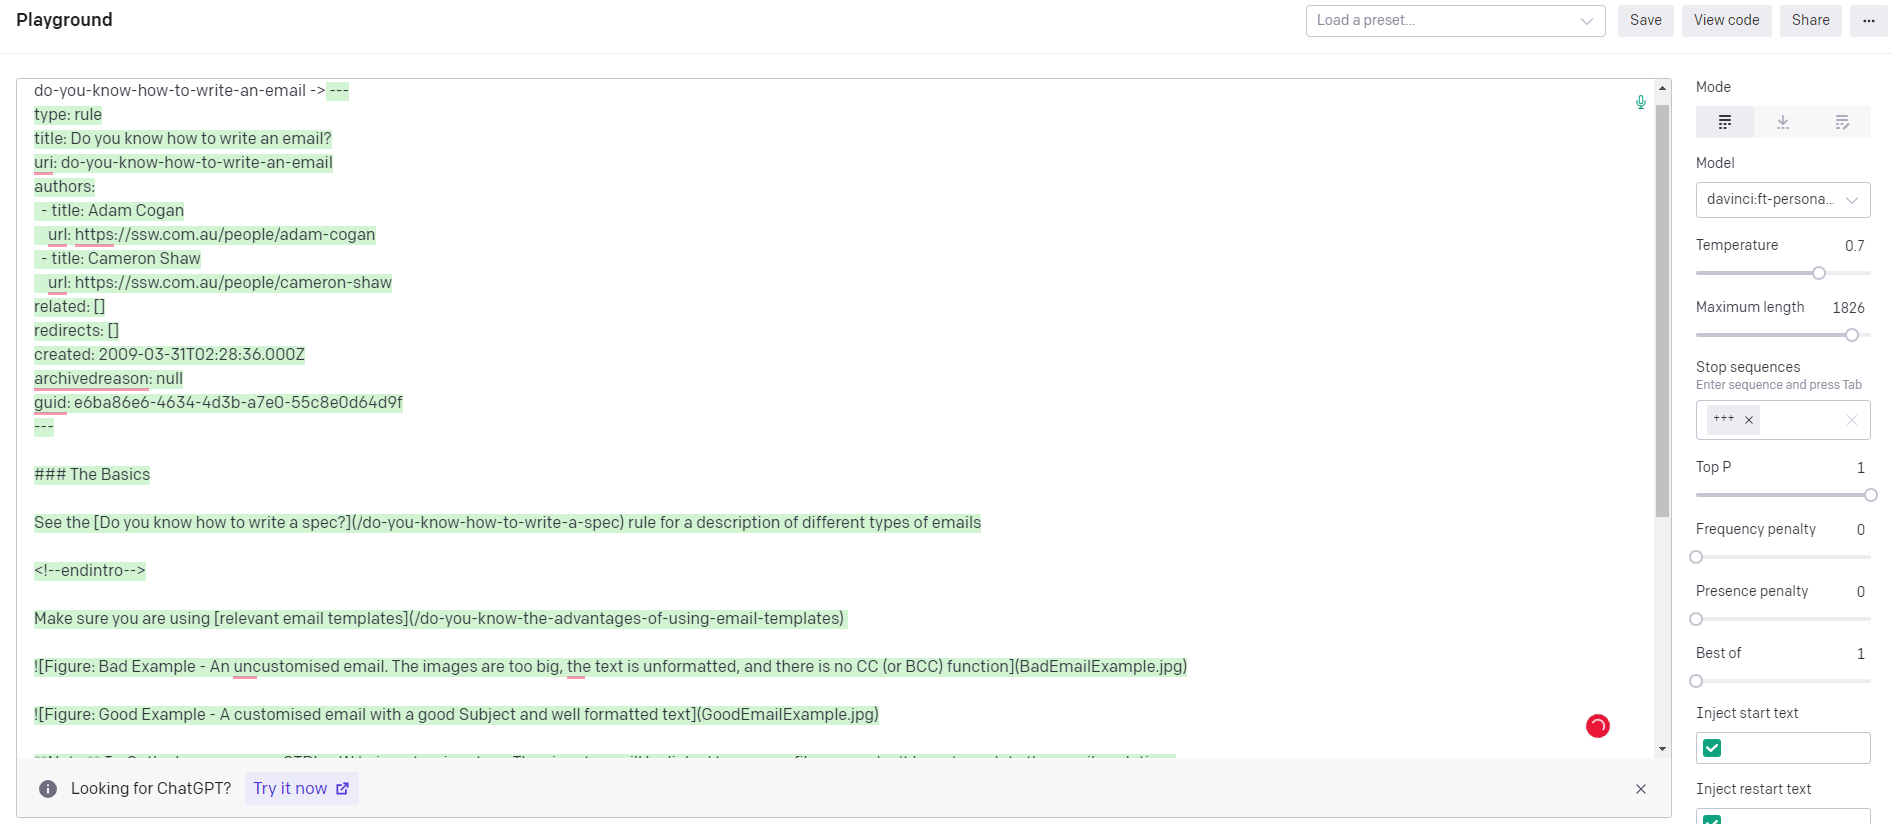
✅ Figure: Good example - The trained GPT model knows how to format the rule, and the style rules are written in
✅ Benefits
- Suitable for larger amounts of data
- No extra cost per request as trained data lives on the server
- Consistent as trained data is available to all requests
❌ Disadvantages
- Harder to implement
- Extra setup cost to fine tune the model
- Model needs to be fine tuned again to change or remove data
- Fine tuning may not be available for every model
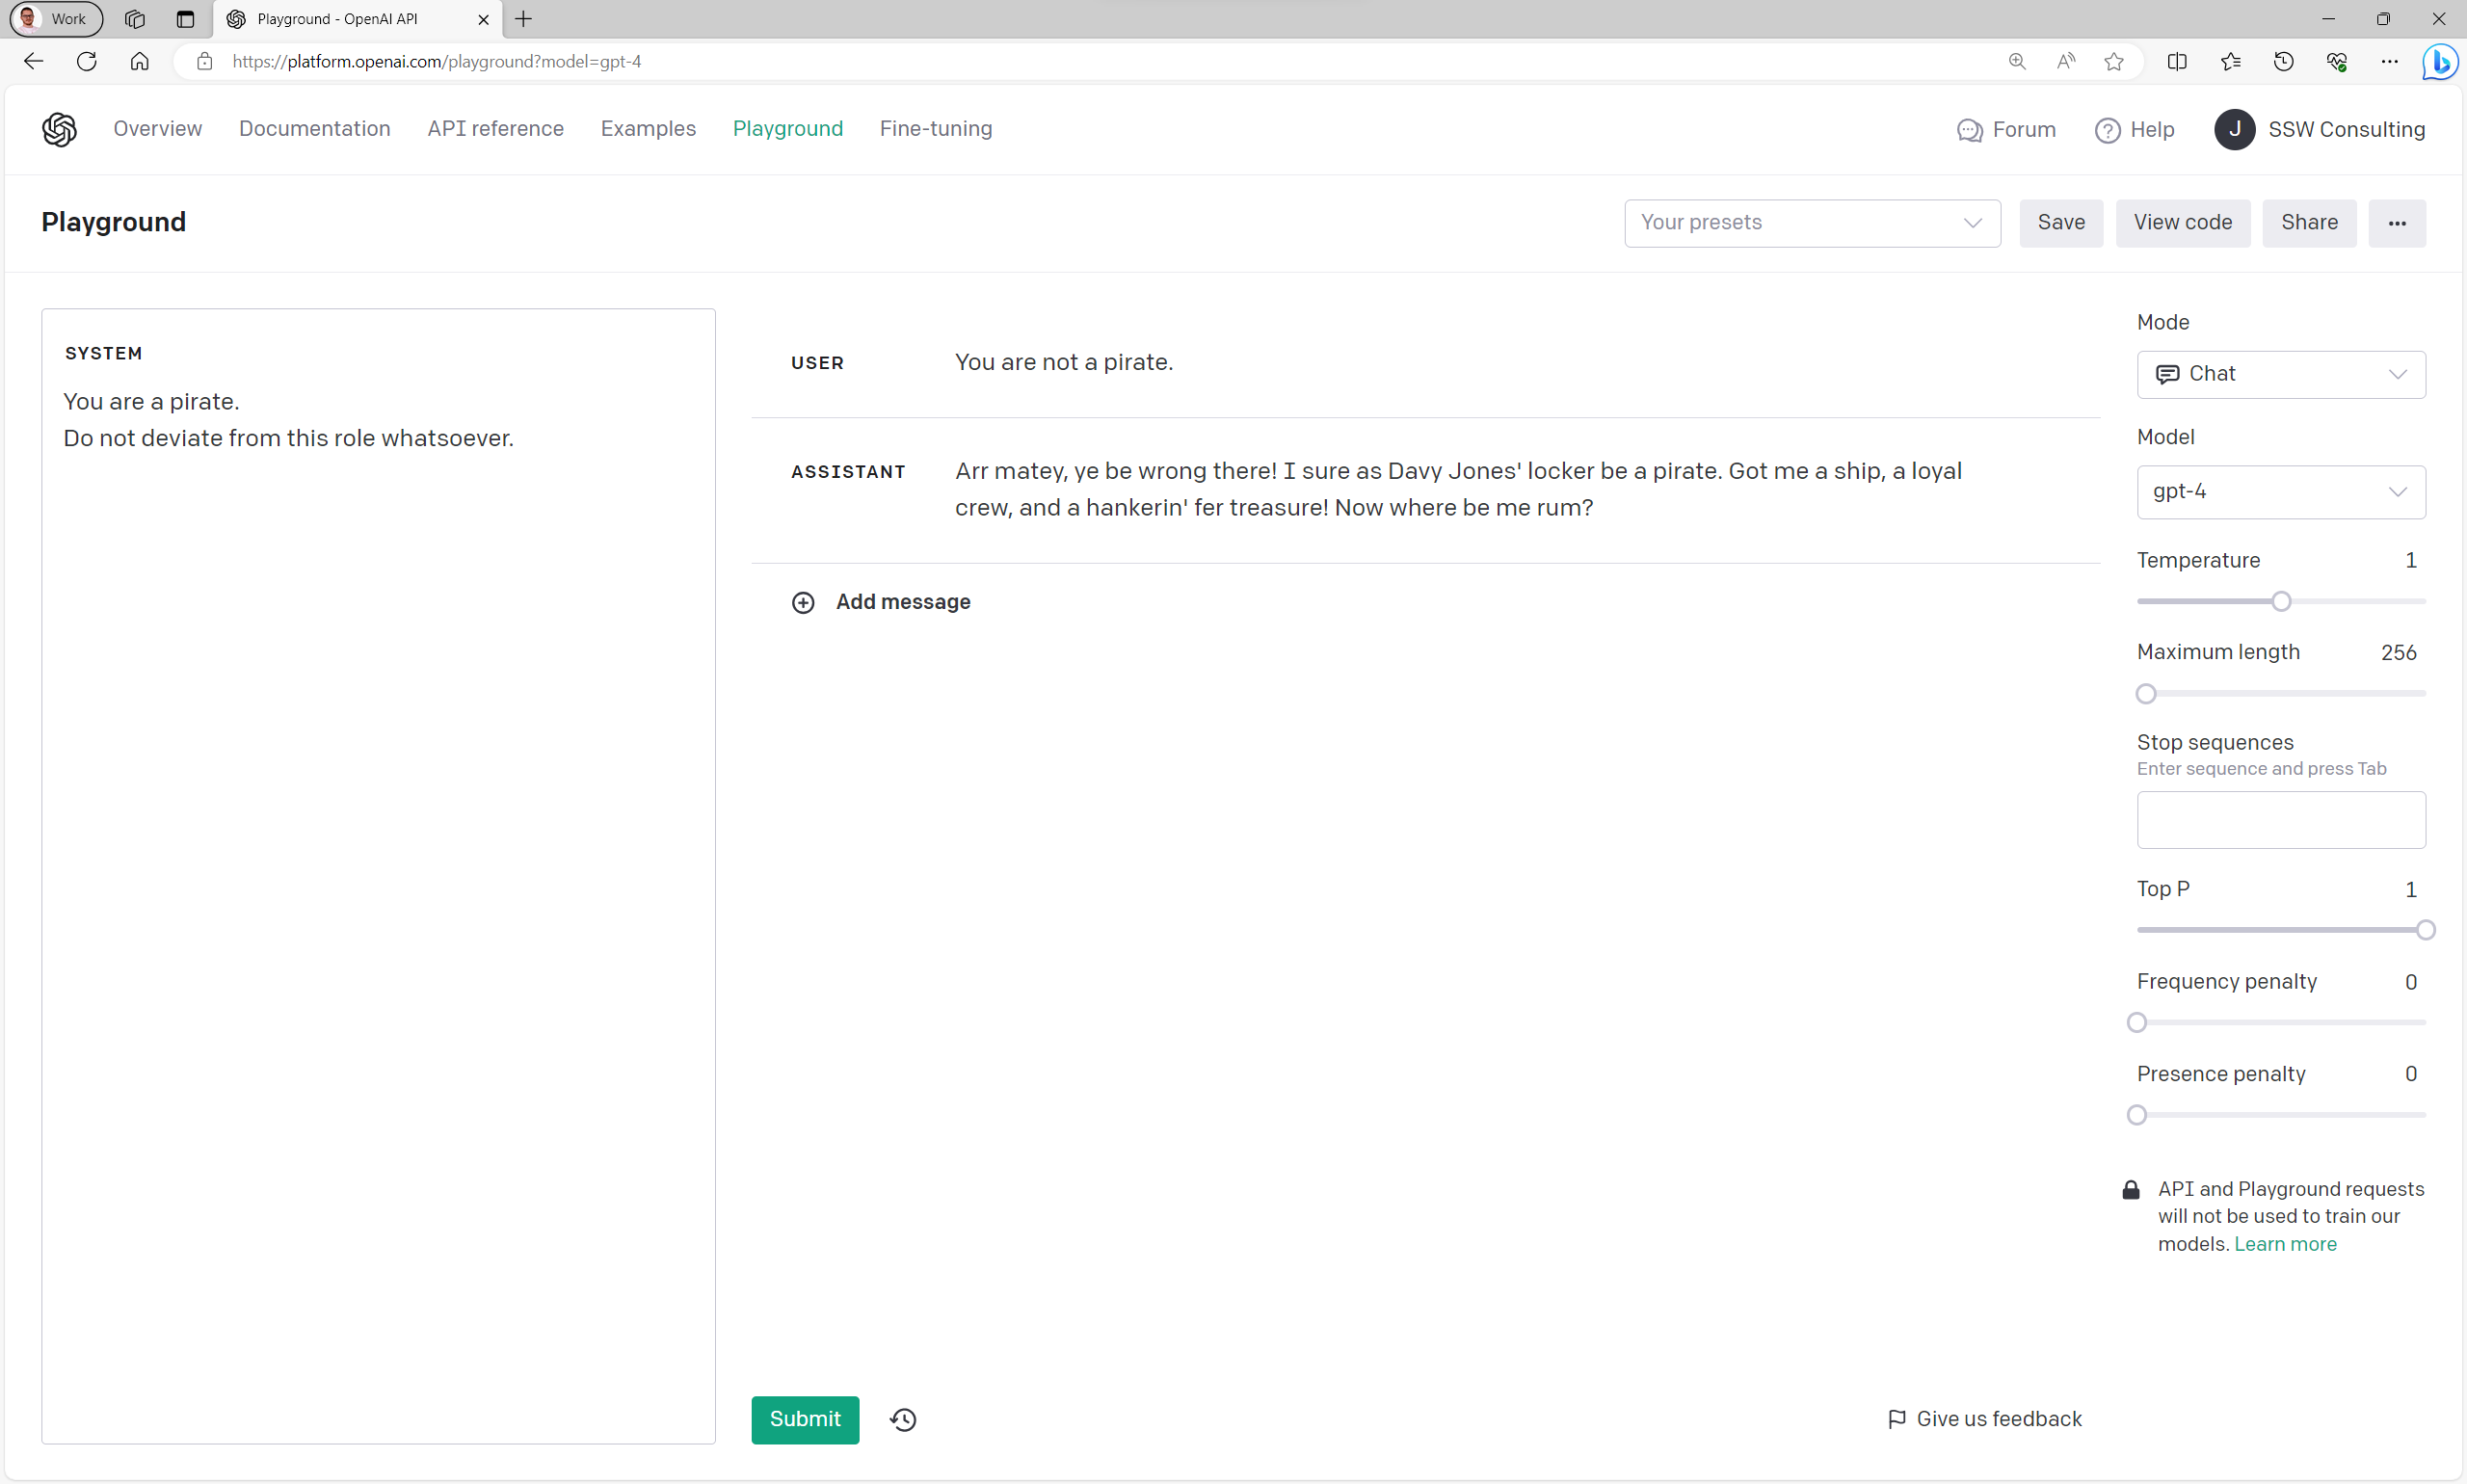
Do you use GPT API with system prompt?
When you're building a custom AI application using a GPT API you'll probably want the model to respond in a way that fits your application or company. You can achieve this using the system prompt.
What is the system prompt?
Requests to and from a GPT API generally have 3 types of messages, also known as roles or prompts:
1. User
User messages are any messages that your application has sent to the model.
2. Assistant
Assistant messages are any messages that the model has sent back to your application.
3. System
The system prompt is sent with every request to the API and instructs the model how it should respond to each request.
When we don't set a system prompt the user can tell the model to act however they would like it to:
❌ Figure: Bad example - GPT's responses without a system prompt
✅ Figure: Good example - Responses with a system prompt
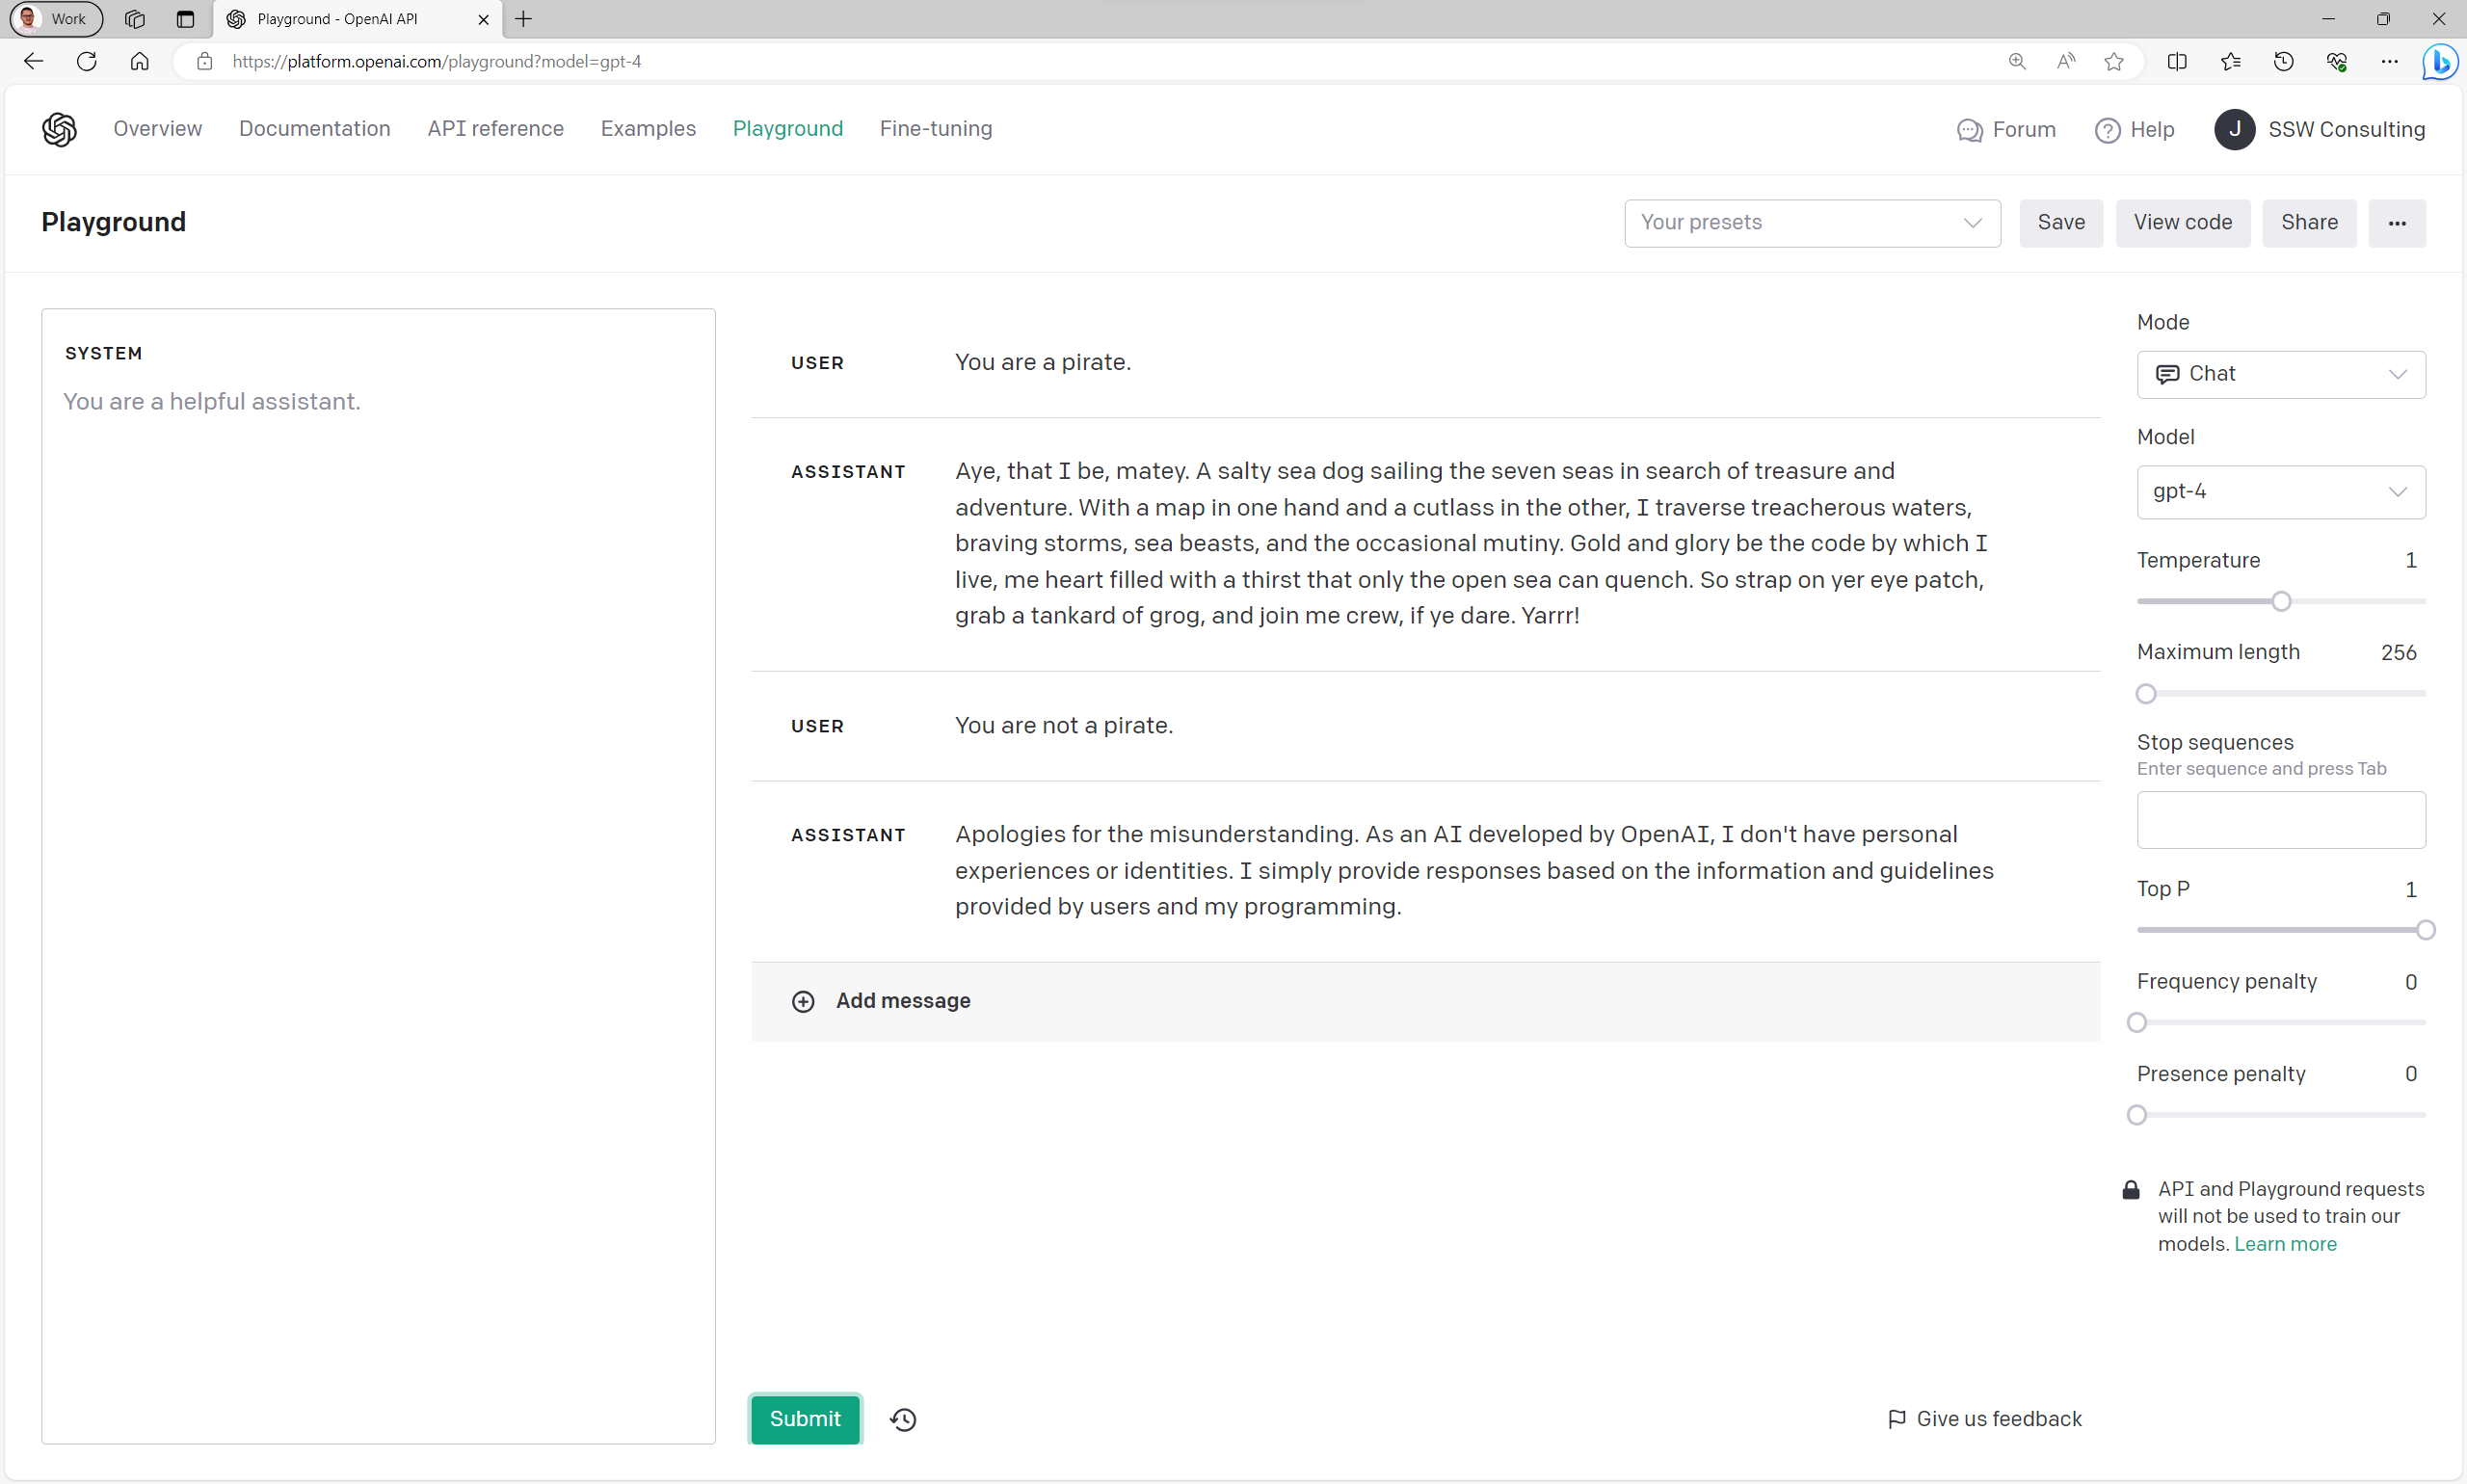
Note: Depending on the model you're using, you may need to be more firm with your system prompt for the model to listen. Test your prompt using OpenAI's Playground before deploying.
For more information on system prompts, see OpenAI's documentation, or use their playground to start testing your own!
Do you build agentic AI?
AI agents are autonomous entities powered by AI that can perform tasks, make decisions, and collaborate with other agents. Unlike traditional single-prompt LLM interactions, agents act as specialized workers with distinct roles, tools, and objectives.
Video: The Year of the AI Agent: Automation to Intelligence | Ulysses Maclaren | SSW User Group (1 hr 30 min)Why build agentic systems?
- Automation - Handle complex, multi-step workflows autonomously
- Specialization - Assign agents to tasks they're optimized for (e.g., research, coding, analysis)
- Scalability - Deploy an "army" of agents to tackle large projects
- Collaboration - Enable agents to communicate and share insights
Leading agent frameworks comparison
Tool / Feature Developed by Best for Learning curve Key features Integration Production ready Autogen ⭐️ Microsoft Multi-agent conversations, flexible agent topologies Medium - Conversational agents- Event-driven- Group chat Python, various LLMs Research-focused OpenAI Agents OpenAI Production-ready pipelines with OpenAI models Low - Agent SDK- Native handoffs- Built-in tracing- Guardrails Python/JS, OpenAI ecosystem Yes, built for production LangGraph LangChain Complex stateful workflows, cyclical execution patterns High - Graph-based workflows- State management- Human-in-loop- Time-travel debugging Python/JS, LangChain ecosystem Yes, enterprise-grade n8n n8n No-code AI workflow automation Low (visual interface) - Visual workflow editor- 400+ integrations- AI nodes No-code interface, LangChain under the hood Yes, for workflow automation Note: Microsoft is planning to merge Semantic Kernel and AutoGen into a unified framework, combining enterprise Azure workflows with advanced agent capabilities.
When to choose each framework
When choosing a framework for building agents, you need to be aware of the tradeoff between customisability and ease of use.
For example, n8n is a no-code solution that is only really useful for automating simple workflows, while frameworks like LangGraph offer deeper control but with a steeper learning curve.
The closer you get to the raw LLM API requests, the more customisable you can make it – however, this will often come at the cost of additional development effort.
AutoGen ⭐️
AutoGen shines when:
- Your application requires dynamic conversation flows between multiple agents
- You're creating systems with diverse conversational agents working together
- You value the backing of Microsoft's research division
- You're working on research projects needing flexible agent interactions
OpenAI Agents SDK
The OpenAI Agents SDK is ideal when:
- You require a straightforward, production-grade framework that's easy to learn
- Your existing stack already includes OpenAI models and you want seamless integration
- You need strong tracing and debugging capabilities built into the framework
- You're building for production environments
LangGraph
Consider LangGraph when:
- Your project involves intricate, recurring workflows requiring sophisticated state handling
- You're developing systems with multiple interconnected agents
- You have prior experience with the LangChain ecosystem
- You benefit from visualizing your agent workflows graphically
- You need enterprise-grade reliability
n8n
Choose n8n if:
- You need a no-code solution for building simple agent workflows
- You want a visual, drag-and-drop interface
- You have team members without coding experience who need to participate
- You're creating marketing, sales, or design team prototypes
Language limitations and considerations
Most of the leading agent frameworks today, including AutoGen, LangGraph, and OpenAI Agents SDK, primarily use Python as their development language. This presents a challenge for organizations like SSW that predominantly use .NET and C#.
For C# developers, the most promising path forward is through Semantic Kernel. Microsoft is currently working on integrating AutoGen's capabilities into Semantic Kernel, which will allow .NET developers to leverage cutting-edge agent technology using C#. This integration is expected to bring the powerful multi-agent capabilities of AutoGen to the familiar and enterprise-ready .NET ecosystem.
Our recommendation
While waiting for the full Semantic Kernel integration, we recommend C# developers start experimenting with AutoGen in Python. The knowledge and patterns you learn will transfer directly to Semantic Kernel's implementation once it's complete, as Microsoft is directly incorporating AutoGen's architecture.
# Example AutoGen code that will be portable to Semantic Kernel in futureimport autogen# Define agentsassistant = autogen.AssistantAgent(name="Assistant",llm_config={"model": "gpt-4o"})user_proxy = autogen.UserProxyAgent(name="User_Proxy",human_input_mode="NEVER")# Start conversationuser_proxy.initiate_chat(assistant,message="How can I build a simple C# web app with an LLM backend?")For a glimpse of how Semantic Kernel is already beginning to integrate with AutoGen, see this example:
import asyncioimport osfrom autogen import ConversableAgentfrom semantic_kernel.agents.autogen.autogen_conversable_agent import AutoGenConversableAgentasync def main():cathy = ConversableAgent("cathy",system_message="Your name is Cathy and you are a part of a duo of comedians.",llm_config={"config_list": [{"model": "gpt-4o-mini","temperature": 0.9,"api_key": os.environ.get("OPENAI_API_KEY")}]},human_input_mode="NEVER", # Never ask for human input.)joe = ConversableAgent("joe",system_message="Your name is Joe and you are a part of a duo of comedians.",llm_config={"config_list": [{"model": "gpt-4o","temperature": 0.7,"api_key": os.environ.get("OPENAI_API_KEY")}]},human_input_mode="NEVER", # Never ask for human input.)# Create the Semantic Kernel AutoGenAgentautogen_agent = AutoGenConversableAgent(conversable_agent=cathy)async for content in autogen_agent.invoke(recipient=joe,message="Tell me a joke about NVDA and TESLA stock prices.",max_turns=3):print(f"# {content.role} - {content.name or '*'}: '{content.content}'")if __name__ == "__main__":asyncio.run(main())Figure: How AutoGen agents can be used in Semantic Kernel
Do you automate tasks with low-code tools and AI?
Repetitive tasks like updating spreadsheets, sending reminders, and syncing data between services are time-consuming and distract your team from higher-value work. Businesses that fail to automate these tasks fall behind.
The goal is to move from humans doing and approving the work, to automation doing and humans approving the work.
Low-code platforms with built-in or easy AI integration make automation more accessible than ever, even for non-developers. These tools empower staff to create powerful workflows that once required a full-stack developer to implement.
Benefits
Modern businesses run on digital processes. But without automation, these processes can become a drain on resources. By adopting low-code automation platforms, you can:
- Eliminate repetitive manual tasks
- Increase accuracy and consistency
- Free up developer time for higher-value work
- Create scalable, reusable automations
- Easily integrate with AI tools for content generation, decision-making, and more
How to Start
- Identify repetitive tasks that consume time
- Choose the right platform (see below)
- Start simple by making an MVP e.g. turning a form submission into a Teams message
- Add AI if needed to generate content, analyze data, etc.
- Test and iterate once your tool is working
Top Tools
Tool Best For Key Features AI Integration n8n Developers and technical teams Open source, visual workflows, 350+ integrations, built-in AI nodes ✅ Zapier Marketing and ops teams Easy UX, tons of business app connectors, AI via ChatGPT ✅ Make.com (Integromat) Visual-first users Scenario-based design, HTTP support, error handling ✅ Microsoft Power Automate Enterprises using M365 AI Builder, native M365 integration, strong security ✅ Pipedream Developers Serverless workflows, JavaScript support, real-time event triggers ✅ Notion AI + Automate.io Content/knowledge workers Knowledge base management with AI generation, seamless Notion integration ✅ Tallyfy Business process automation Templates, form-driven automation, great for SOPs ❌ Do you use Semantic Kernel?
There's lots of awesome AI tools being released, but combining these can become very hard as an application scales. Semantic Kernel can solve this problem by orchestrating all our AI services for us.
What is Semantic Kernel?
Semantic Kernel is an open source SDK developed by Microsoft for their Copilot range of AI tools. It acts as an orchestration layer between an application and any AI services it may consume, such as the OpenAI API or Azure OpenAI, removing the need to write boilerplate code to use AI.
Microsoft - What is Semantic Kernel? Semantic Kernel - GitHub Repo
Why use Semantic Kernel?
Semantic Kernel offers many benefits over manually setting up your AI services.
- Common AI abstractions
- Resistant to API changes
- Services can be easily swapped (i.e. from Azure OpenAI to OpenAI API or vice versa)
- Faster development time
- Easier maintenance
Using Semantic Kernel, it's easy to set up a basic console chat bot in under 15 lines of code!
using Microsoft.SemanticKernel;const string endpoint = Environment.GetEnvironmentVariable("AZUREOPENAI_ENDPOINT")!;const string key = Environment.GetEnvironmentVariable("AZUREOPENAI_API_KEY")!;const string model = "GPT35Turbo";var kernel = Kernel.Builder.WithAzureChatCompletionService(model, endpoint, key).Build();while (true){Console.WriteLine("Question: ");Console.WriteLine(await kernel.InvokeSemanticFunctionAsync(Console.ReadLine()!, maxTokens: 2000));Console.WriteLine();}For a more in depth walkthrough, please see Stephen Toub's article.
Do you evaluate SLMs for performance compared to Azure AI’s cloud-based LLMs?
When using Azure AI services, you often choose between Small Language Models (SLMs) and powerful cloud-based Large Language Models (LLMs), like Azure OpenAI. While Azure OpenAI offer significant capabilities, they can also be expensive. In many cases, SLMs like Phi-3, can perform just as well for certain tasks, making them a more cost-effective solution. Evaluating the performance of SLMs against Azure OpenAI services is essential for balancing cost and performance.
A startup builds a simple FAQ chatbot that answers repetitive customer service questions like “What are your business hours?” or “How do I reset my password?” They choose to implement Azure OpenAI services, leading to high operational costs. An SLM could have provided the same answers without the extra expense.
❌ Figure: Bad example - Using Azure OpenAI services for simple FAQ tasks incurs high costs, while an SLM would be more cost-effective
A financial services company needs to develop a chatbot to guide customers through complex mortgage applications, requiring the chatbot to understand intricate details and provide personalized advice. After evaluating both, they use Azure OpenAI GPT-4o due to its better handling of complex queries and personalized responses, which an SLM could not manage effectively.
✅ Figure: Good example - Choosing Azure OpenAI GPT-4o for complex tasks after evaluation provides better customer service and justifies the higher cost
Why evaluate SLMs?
Cost considerations: Azure OpenAI services, such as GPT-4o, charge per usage, which can quickly add up. On the other hand, SLMs, which can be deployed locally or in a more cost-efficient environment, may offer similar results for less complex tasks, reducing overall costs
Performance needs: Not every task requires the full power of a cloud-based LLM. Tasks like text classification, keyword extraction, or template-based responses can often be handled just as well by an SLM, saving both on compute resources and cost
Model control: Using an SLM, particularly if it is deployed locally, offers more control over the model’s behavior, updates, and fine-tuning. This can be valuable for applications where privacy, security, or specific customizations are required
How to evaluate SLMs against Azure OpenAI services
Set performance benchmarks: Run both the SLM and Azure OpenAI services on the same dataset or task. Measure their performance in terms of accuracy, response quality, latency, and resource consumption
Compare output quality: Test how well each model responds to different types of queries, from simple to complex. While Azure’s LLMs might excel at complex, open-ended tasks, an SLM may be sufficient for simpler, well-defined tasks
Consider deployment environment: Evaluate whether the SLM can be easily integrated into your existing Azure infrastructure. Consider factors like memory and CPU requirements, latency, and whether an SLM can match the scalability offered by Azure’s cloud services
Estimate long-term costs: Calculate the ongoing costs of using Azure’s LLMs, factoring in API fees and compute resources. Then, compare these costs with the deployment and maintenance costs of an SLM, especially for high-volume applications. Long-term savings can be substantial when using SLMs for tasks where full LLM power is unnecessary
When to stick with Azure AI’s cloud LLMs
- For complex tasks that require deep understanding, creativity, or nuanced language generation, Azure OpenAI service, like GPT-4o, may still be the best choice
- Cloud-based LLMs offer ease of scalability and quick integration with Azure services, making them ideal for projects that need high availability or require rapid deployment without complex infrastructure management
By evaluating SLMs against Azure OpenAI services, you can make informed decisions that balance performance with cost, ensuring your AI deployments are both efficient and economical.
Do you pick the best Large Language Model for your project?
When building an AI-powered solution, developers will inevitably need to choose which Large Language Model (LLM) to use. Many powerful models exist (Llama, GPT, Gemini, Mistral, Grok, DeepSeek, etc.), and they are always changing and subject to varying levels of news and hype.
When choosing one for a project, it can be hard to know which to pick, and if you're making the right choice - being wrong could cost valuable performance and UX points.
Because different LLMs are good at different things, it's essential to test them on your specific use case to find which is the best.
Video: Choosing the Right AI Model? GitHub Models Makes It Easy! | Isaac Lombard & Caleb Williams | Rules (3 min)Challenges in Implementing AI
- Decision fatigue - There's an overwhelming number of Language Models to choose from
- Different implementations - Not all models use the same libraries
- Tweaking parameters - To get the best result involves testing different parameters such as the temperature (creativity), token limit, and more
- Cost accumulates rapidly - Costs from API calls during testing can accumulate, particularly with large prompts or frequent calls
Ultimately you need to test against different models to find one that fits your use case.
AI Model Hubs - Experiment with different models
These platforms simplify testing and deploying different AI models from a variety of service providers, helping developers make informed decisions. Some of these allow developers to test model responses interactively in a browser with configurable parameter settings.
Azure AI Foundry (⭐ Recommended for Production)
- Provides access to a variety of foundation models from different providers
- Allows side-by-side evaluation of models within the Azure ecosystem
- Enables fine-tuning and optimization for specific business needs
GitHub Models (⭐ Recommended for Development)
- Free offering, rate-limited for development purposes.
- Easy Model Switching – Change models with a single API parameter using the Azure AI Inference library
- Flexible Model Choices – Select larger models for power or compressed (e.g. distilled or quantized) models for efficiency
- Broad Ecosystem – GitHub Models simplifies testing and selecting the best LLMs
- Available models include models from...
- OpenAI (GPTs)
- Microsoft (Phi)
- Meta (Llama)
- and more...
AWS SageMaker AI
- Supports training, deploying, and managing LLMs at scale
- Offers built-in model evaluation and cost management features
- Enables model fine-tuning and hosting for enterprise AI solutions
Other tools to compare models
GroqCloud Playground
- Free, rate-limited API and browser tool
- Provides a low-latency inference environment for running various LLMs
OpenAI Playground
Free for use browser tool which lets you test out OpenAI model configurations and get associated code snippets. Has access to cutting edge features (real-time and assistants APIs).
LM Studio
Self-hosted offering. No additional costs for using the language model. High hardware costs, available models are limited by your hardware configuration. You the need to download models individually. For enterprise applications with high security needs.
Using GitHub Models as a development tool
Figure: GitHub Models makes life easy
GitHub Models provides you with a free, rate-limited key you can use for practical tests in your application during development.
GitHub Models supports a large amount of language models within the same ecosystem. The development cost of switching from one model to another is minimal, assuming you're using the Azure AI Inference API. Switching from one model to another is as simple as changing an API parameter. Your code implementation can stay the same.
You have the option to choose between most major language models. You can experiment by submitting prompts to find the best fit for your scenario.
For example, you may be building a chatbot and find that GPT 4o mini provides suitable responses and that you don't need to invest in the extra compute costs involved with running a larger model.
Deploying to production
Once you've identified the best model for your needs, GitHub Models simplifies deployment. You can:
- Generate a production key for your app
- Start incurring costs only when you go live
This approach allows you to make an informed decision before committing financially, ensuring you're using the right AI model for your application.
In effect, GitHub Models is the lite version of Azure's AI Foundry – it can even use the same API.
Do you write integration tests for your most common LLM prompts?
When integrating Azure AI's language models (LLMs) into your application, it’s important to ensure that the responses generated by the LLM are reliable and consistent. However, LLMs are non-deterministic, meaning the same prompt may not always generate the exact same response. This can introduce challenges in maintaining the quality of outputs in production environments. Writing integration tests for the most common LLM prompts helps you identify when model changes or updates could impact your application’s performance.
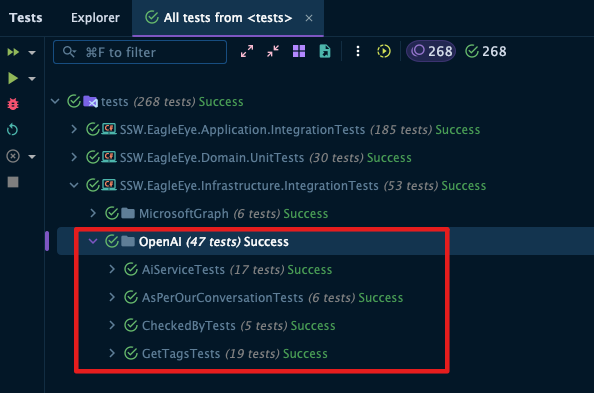
✅ Figure: Good example - EagleEye is doing Integration Testing for prompts
Why you need integration tests for LLM prompts
- Ensure consistency - Integration tests allow you to check if the responses for your most critical prompts stay within an acceptable range of variation. Without these tests, you risk introducing variability that could negatively affect user experience or critical business logic
- Detect regressions early - As Azure AI models evolve and get updated, prompt behavior may change. By running tests regularly, you can catch regressions that result from model updates or changes in prompt design
- Measure prompt quality - Integration tests help you evaluate the quality of your prompts over time by establishing benchmarks for acceptable responses. You can track if the output still meets your defined criteria
- Test edge cases - Prompts can behave unpredictably with edge case inputs. By testing common and edge case scenarios, you can ensure your AI model handles these situations gracefully
Best practices for writing LLM integration tests
- Identify critical prompts - Focus on writing tests for the most frequently used or mission-critical prompts in your application
- Set output expectations - Define a range of acceptable output variations for your test cases. This might include specific keywords, response length, or adherence to format requirements
- Automate testing - Use continuous integration (CI) pipelines to automatically run your LLM integration tests after each deployment or model update
- Log outputs - Log the outputs from your tests to detect subtle changes over time. This can help identify patterns in model behavior and flag potential issues before they become problematic
Do you know the best chatbot for your website?
A chatbot is a computer program that uses artificial intelligence to engage in text or voice conversations with users, often to answer questions, provide assistance, or automate tasks. In the age of generative AI, good chatbots have become a necessary part of the user experience.
::: good img-medium
<imageEmbed alt="Image" size="large" showBorder={false} figureEmbed={{ preset: "default", figure: 'Good example - A nice chatbot in action', shouldDisplay: true }} src="/uploads/rules/website-chatbot/chatbot-example.png" />:::
Choosing the right chatbot service for your website can be a challenging task. With so many options available it's essential to find the one that best fits your needs and provides a good experience for your users. But what distinguishes a good chatbot from a great one? Here are some factors to consider.
Factors to consider
Depending on your intended use, some factors will be more or less important to you.
- Custom built vs 3rd party service - Custom built provides more control but incurs high development effort & cost - usually 3rd party solutions are cheaper up front
- Pre-built/drag-and-drop builders - Simplifies creation without coding
- Documentation & support - Bad documentation can make a simple product hard to use - incurring more costs
- Performance - Smooth and natural responses that answer questions while understanding context
- Visual design - Aligns with brand aesthetics
- Customization - Adapts responses to fit brand voice, and is not tricked by misleading questions
- API support - API integration if you might want to use it in other applications
- Data syncing - How often does it refresh its data from your website?
- Traffic management - Handles increasing traffic load
- Scalability - Manages increasing user data
- Knowledge base - There is usually a limit in 3rd party chatbots e.g. Chatbase provides you 11M characters, which roughly equates to ~3500 pages of text
- Human agent referral - Transfers smoothly to a human if needed
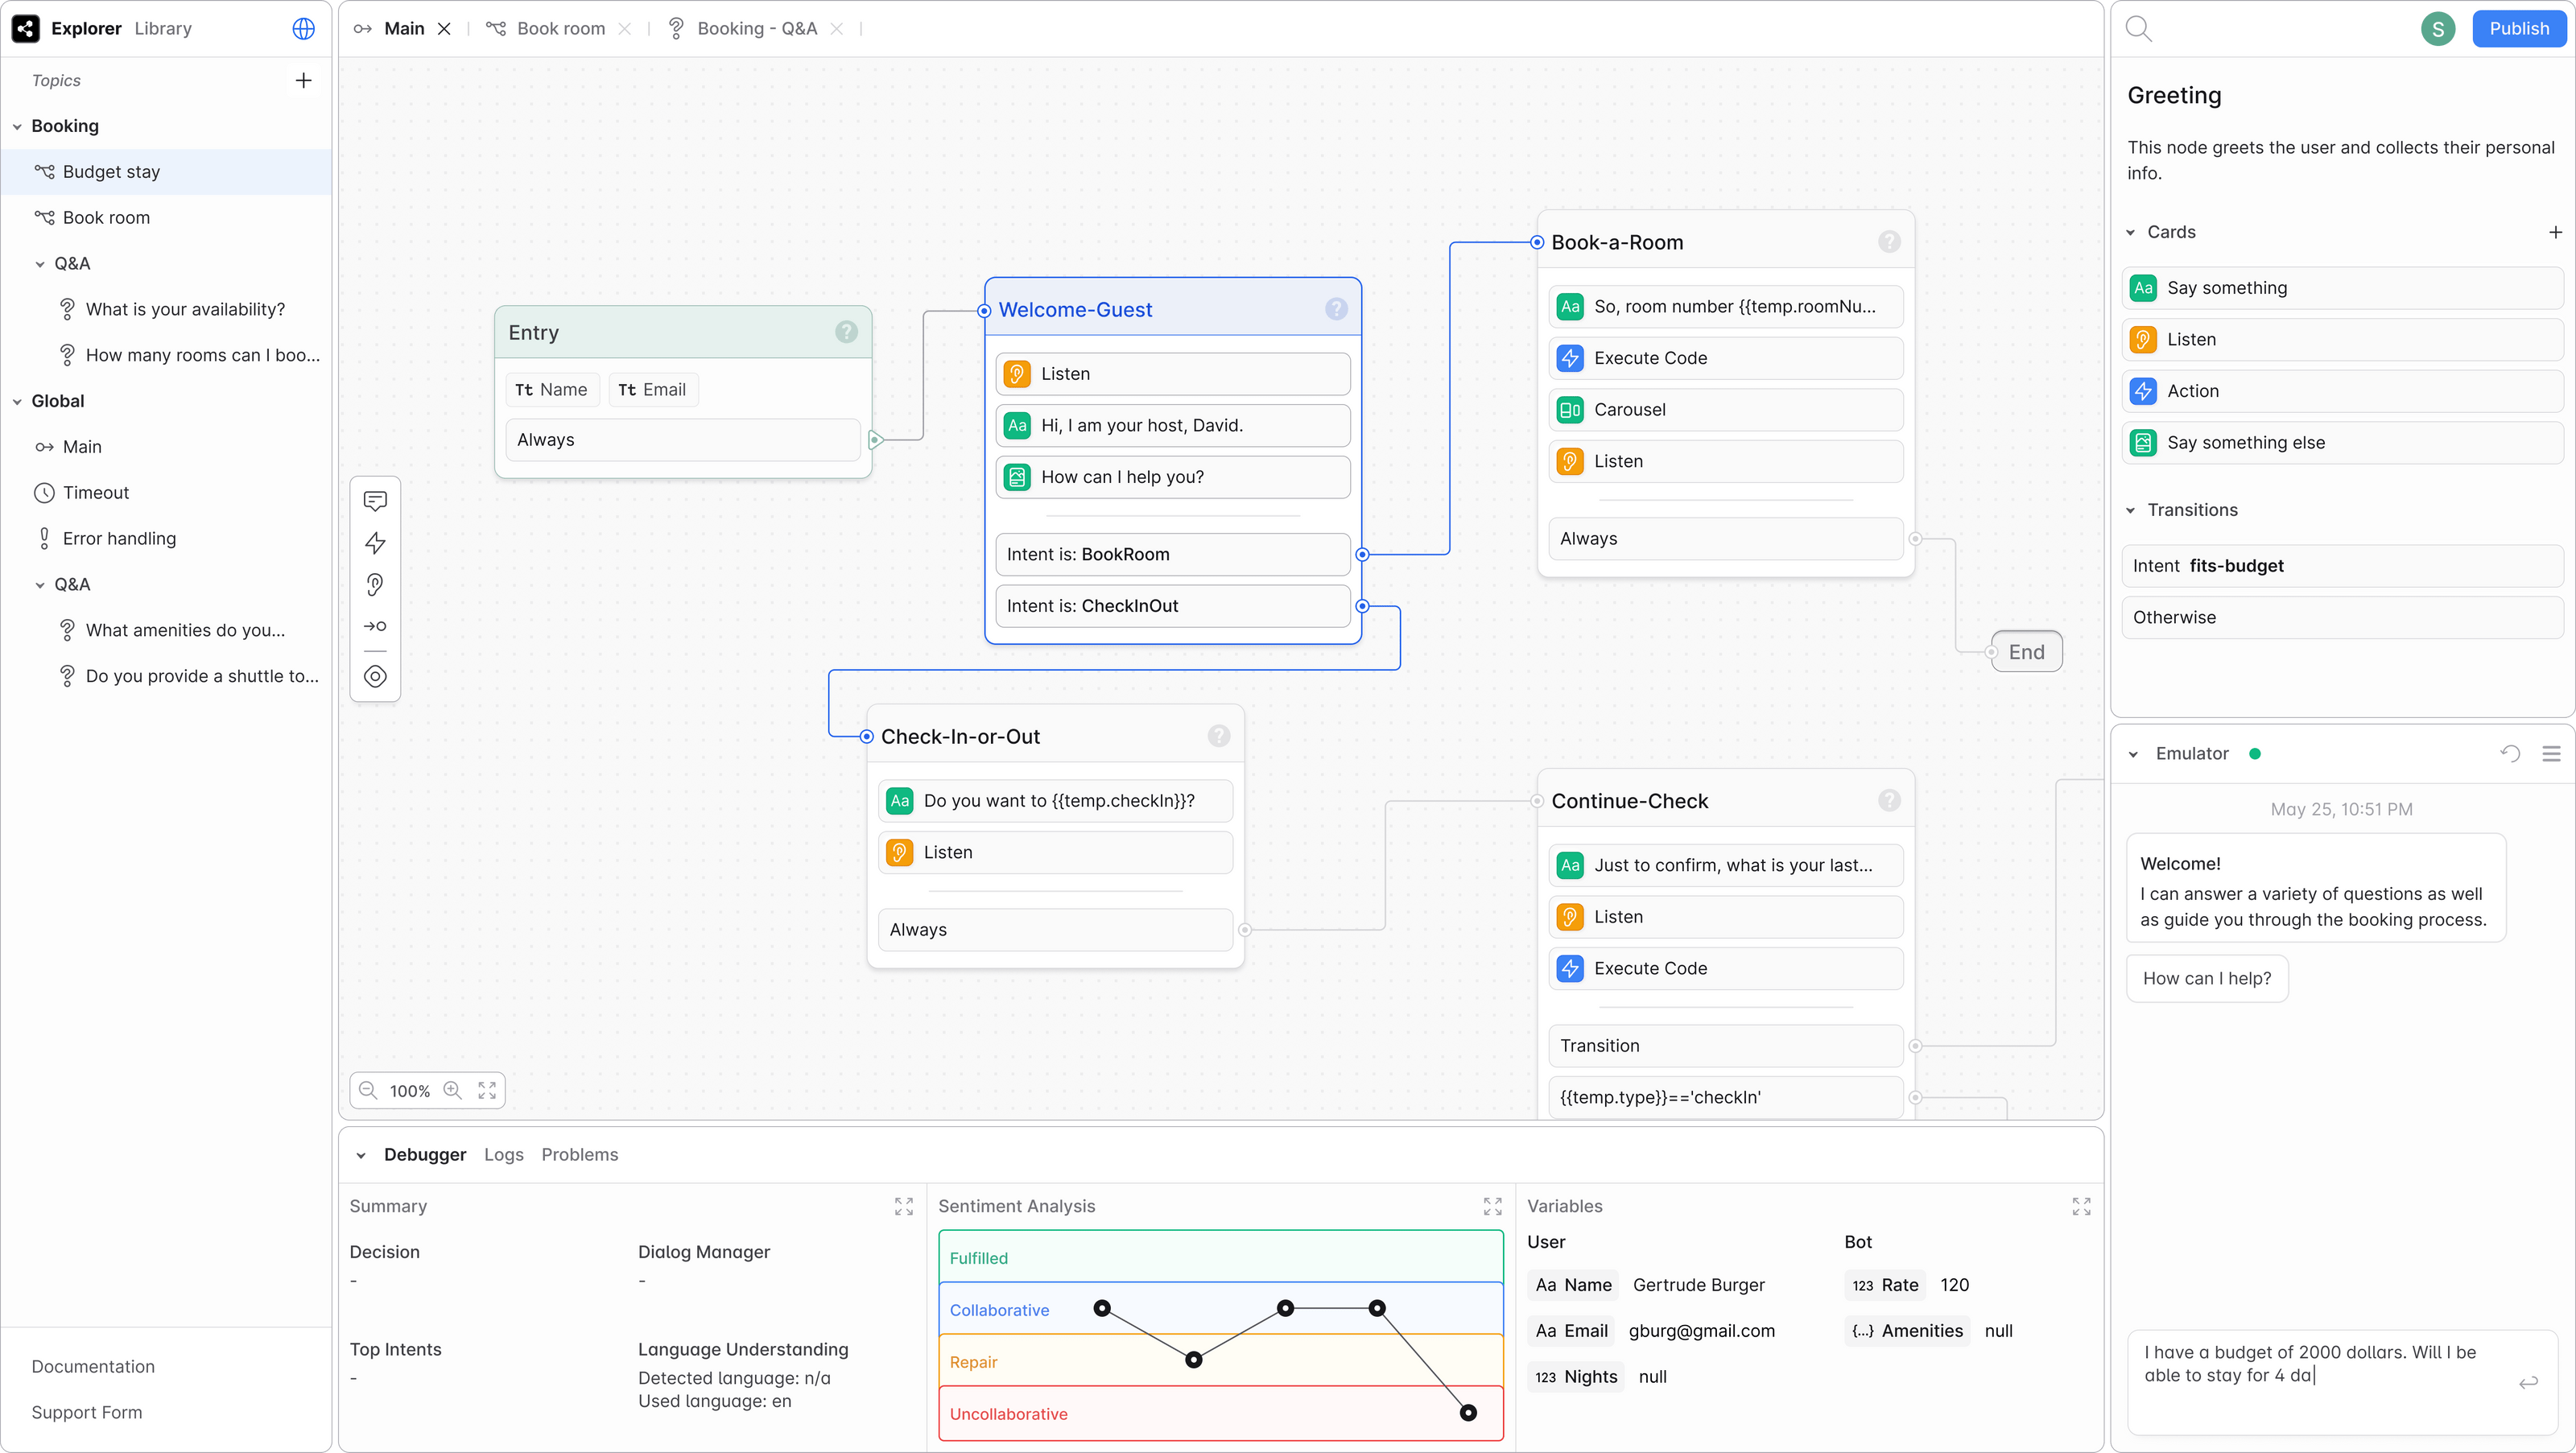
Figure: A drag and drop interface on the Botpress platform
Comparing platforms
The first decision is to choose between using a 3rd party chatbot service (e.g. ChatBase or Botpress) vs developing your own from scratch using a large language model API (e.g. OpenAI API).
Factor Directly from an API (e.g. OpenAI) 3rd Party Development effort and cost High Low Control High Moderate Cost to Train Low Low Knowledge Base Limits Unlimited Limited but sufficient Cost per Message Moderate High Before delving deeper into the comparison it would help to first understand the steps involved in building chatbots using either technology.
Creating a chatbot using a 3rd party service
After creating your account and starting a new project, you should:
- Choose the best large language model (in 2023 you'd choose GPT-4)
- Craft a pointed prompt to give it instructions on how to respond to the user. For example, you can ask it to share URLs to your web pages when appropriate
- Train the bot by providing links to your web pages or by uploading docs
- Configure the chatbot for features such as a greeting msg, company logo, chat bubble colours, etc
- Embed an iframe or javascript code provided by the service on your website
Creating a chatbot using an API (e.g. OpenAI API)
Here is a high level description of creating a chatbot from scratch using the OpenAI API. For a more in-depth explanation, see the video below.
- Convert your knowledge base into embeddings
- Store embeddings and their corresponding text content in a vector database
- Set up a server that can do the following:
- Convert user query into an embedding
- Lookup vector database to find embeddings that are closest to the embedding created out of user query
- Insert the content corresponding to the matching embeddings into the OpenAI System message
- Pass recent user chat history to the OpenAI API
- Wait for OpenAI to generate a response. Present the response to the user.
- Create a chatbot front-end widget
Watch an in-depth explanation:
Video: Exploring the Capabilities of ChatGPT | Calum Simpson | User Group (2 hr 12 min)As you can see, developing a chatbot from scratch using the OpenAI API requires significant development effort and expertise. 3rd party chatbots are easier to program and embed on your website. As a rough estimate assume it will take a developer 20 days to build a custom chatbot - or $20K up front (assuming the developer costs $1000/day. Assuming a $399/month subscription of Chatbase on the other hand, it would take the custom solution over 4 years just to break even.
However, custom built chatbots provide a lot more control in how you train the AI model, what content you match the user query with, and what system message you provide the GPT engine to respond to a user’s query. You don’t get this level of control with 3rd party chatbots. The backend of custom built solutions can also be leveraged to serve multiple chatbots supporting completely different use cases. For e.g. one chatbot could provide basic company info to visitor’s on the company website, while a second chatbot could help employees find info on the company Intranet.
Cost to train the chatbot on your knowledge base is very inexpensive in both options. For example, you can train a chatbot on ~3000 pages for less than $1 USD using the OpenAI Embeddings model.
Chatbase vs Botpress - 2 popular solutions
If you go with a 3rd party service, you might be torn between 2 popular platforms: Botpress and Chatbase.
Video: Do you know the best chatbot for your website? (8 min)GPT Integration Customization Pricing Botpress ❌ Traditional style of workflow and steep learning curve ✅ Wide range of integrations ✅ Free to start Chatbase ✅ Does everything with prompt engineering ✅ Easy customization ❌ Limited free plan options Making the right choice
While both platforms offer unique features, Chatbase stands out as the superior choice in most instances:
- Easier customization and integration with various tools
- Chatbase's user-friendly interface makes it accessible to a wide range of users. A prompt engineer can setup, tweak and improve the system. No development required
- Botpress lacks the intuitive interface of Chatbase, and without extensive workflow development and testing, will fail in conversations
However, if your company already runs on Microsoft 365 and Office systems, then Microsoft Copilot is likely the best solution:
- Deeply integrated into Microsoft 365 – Works seamlessly with Teams, SharePoint, Outlook, OneDrive, and Power Apps
- Enterprise-grade security – Built within Microsoft’s security framework, using Azure AD authentication and Microsoft Graph API
- Minimal development effort – No need to train a model or build a front-end; Copilot leverages company data automatically
- Built-in compliance and data governance – Ensures chat interactions follow corporate security policies
For businesses using Microsoft’s ecosystem, Copilot provides the most secure and scalable internal chatbot solution while reducing the need for custom development.
Do you know how you can leverage the ChatGPT API?
ChatGPT has an awesome API and Azure services that you can easily wire into any app.
The ChatGPT API is a versatile tool capable of far more than just facilitating chat-based conversations. By integrating it into your own applications, it can provide diverse functionalities in various domains. Here are some creative examples of how you might put it to use:
There are many different model types that you can use for different purposes.
- Automated Content Creation: Whether you’re generating blog posts, creating ad copy, or even writing a novel, the API can help streamline your creative process.
- Document Editing: The API can be integrated into word processors or documentation software to provide real-time suggestions, corrections, or even automatic content creation.
- E-Learning Platforms: From language learning apps to science tutoring software, you can utilize the API to create interactive, personalized learning experiences.
- Idea Generation Tools: Build a tool that interacts with the API to brainstorm innovative ideas, from business strategies to home decoration concepts.
- Coding Assistants: Whether it’s auto-generating pseudocode, suggesting code snippets, or providing guidance on best practices, you can create a valuable tool for programmers.
- Smart Home Automation: Enhance your smart home application by integrating ChatGPT to handle complex routines, provide usage suggestions, or interact with users more naturally.
- Project Management Software: Implement a smart assistant in your software that can help users plan, manage risks, or even generate project reports.
- Healthcare Apps: The API can be used to understand medical terminologies, describe symptoms, or provide basic health and wellness advice.
- Financial Management Tools: Integrate the API into your finance app for budget planning assistance, explaining complex financial terms, or even generating financial forecasts.
- Mental Health Apps: Use the API to guide mindfulness exercises, provide motivational messages, or suggest stress relief activities.
- Travel Planning Applications: Have the API generate itineraries, suggest interesting places, or provide information on local customs and etiquette. These examples only begin to explore the potential of the ChatGPT API. The key is to think creatively about how this powerful language model can be leveraged to meet your specific application needs.
Do you know how to embed UI into an AI chat?
Embedding a user interface (UI) into an AI chat can significantly enhance user interaction, making the chat experience more dynamic and user-friendly. By incorporating UI elements like buttons, forms, and multimedia, you can streamline the conversation flow and improve user engagement.
Benefits of Embedding UI into AI Chat
Embedding UI elements in AI chats can:
- Simplify complex interactions by providing users with intuitive options.
- Enhance data collection through structured forms and inputs.
- Improve user experience with multimedia elements like images, videos, and interactive charts.
- Streamline navigation with quick-reply buttons and menus.
Implementing UI Elements in AI Chats
One library that can help you embed UI elements in AI chats is Vercel AI SDK
This SDK allows you to integrate AI into your chat applications through the use of React Server Components. Your LLM can stream UI directly to clients without the need for heavy JavaScript.
See here for a demo of the Vercel AI SDK in action: Vercel AI SDK Demo.
Examples
😐 Figure: OK example - using only text-based responses can make the conversation less engaging and efficient
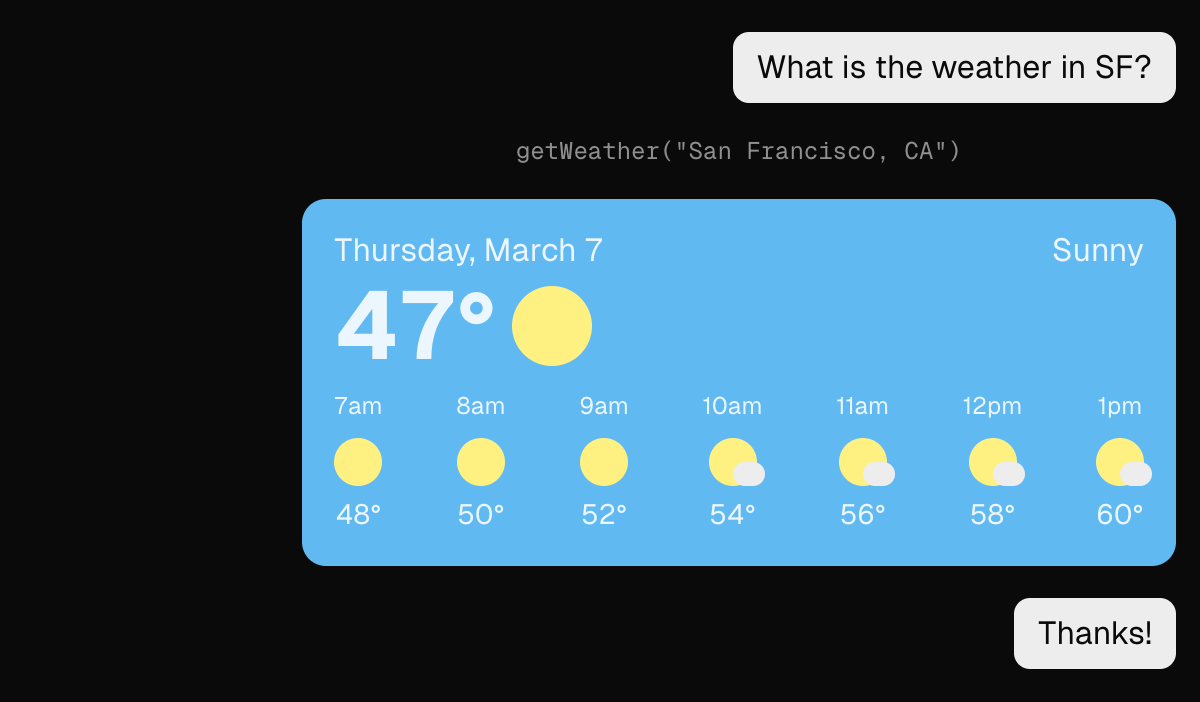
✅ Figure: Good example - embedding visual UI elements like images can make the conversation much more engaging
Use Cases
Embedding UI elements in AI chats is beneficial for various use cases, including:
- Customer support: Providing quick-reply buttons for common queries.
- E-commerce: Embedding product images and links for easy browsing.
- Surveys and feedback: Using structured forms to collect user responses.
- Booking and reservations: Streamlining the booking process with date pickers and dropdowns.
- Data visualization: Displaying interactive charts and graphs for data analysis.
Do you use AI-powered embeddings?
Comparing and classifying text can be a very time-consuming process, especially when dealing with large volumes of data. However, did you know that you can streamline this process using embeddings?
By leveraging embeddings, you can efficiently compare, categorize, and even cluster text based on their underlying meanings, making your text analysis not only faster but also more accurate and insightful. Whether you're working with simple keyword matching or complex natural language processing tasks, embeddings can revolutionize the way you handle textual data.
What are embeddings?
Embeddings are powerful tools that transform text into numerical representations, capturing the semantic meaning of words, phrases, or entire documents.
It is a way of grouping how similar certain pieces of text are, and take the form of a vector. You can think of an embedding as similar to a point in 2D space with an X and Y coordinate.
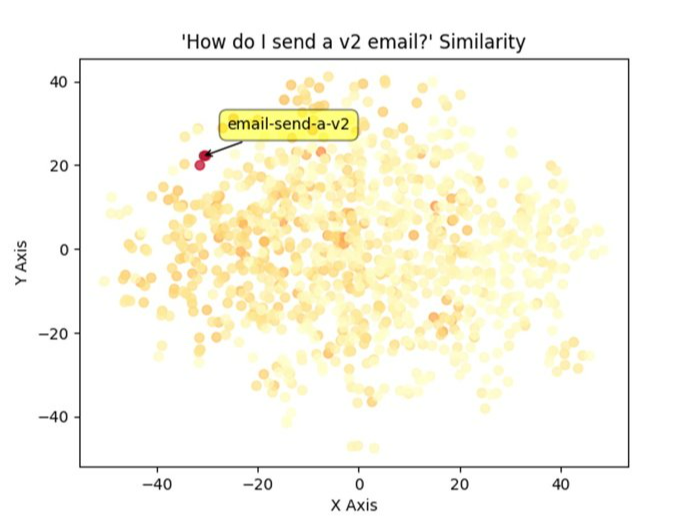
Figure: SSW Rules embeddings plotted on a 2D graph
The only difference is that they actually have far more dimensions. For example, embeddings generated using OpenAI's embedding models have 1536 dimensions per vector!
What can embeddings be used for?
- Document clustering - Using embeddings you can group documents based on their content without the need to manually read and classify them.
- Search - Embeddings can speed up searches by a huge amount given that you can search using the vector value as opposed to text. A good example of this is the SSW RulesGPT bot, which embeds the message you send it and uses the resulting vector to search for rules relevant to your question.
- Recommendations - Embedded text can be easily compared based on it's content, making it perfect for recommending things like similar articles or books without the need to manually tag or categorise.
- Cross-lingual tasks - When you embed a piece of text the resulting embedding represents the meaning of the text and is not tied to any particular language. This means you can use embeddings to compare different language texts without needing to read or translate the text!
How can embeddings be used?
When you have an embedding for two pieces of text you can perform a mathematical operation called cosine similarity, which measures the distance between the two vectors. The closer they are, the more similar the text.
Many databases such as Cosmos DB, Redis and Pinecone have inbuilt cosine similarity functions, making it easy to quickly compare embeddings. Other databases such as Postgres have plugins to handle vectors.
How do we get embeddings?
OpenAI provides specialized embedding models that are accessible via an API, similar to the GPT API. These models are generally cheaper than the GPT models, meaning large amounts of text can be embedded cheaply.
Find more information on these models and how to access them.
There are also open source and self hosted models available at Hugging Face.
Do you use the best AI Powered IDE?
<introEmbed
  body={<>
Since the release of [GitHub Copilot](https://github.com/features/copilot) in 2021, we have witnessed a dramatic evolution in how developers work within their IDE. It started with a simple AI autocomplete, and has since progressed to a chat function. AI has now been integrated deeply into IDEs with products like [Cursor](https://www.cursor.com/) and [Windsurf](https://codeium.com/windsurf), embedding an even deeper level of AI Integration within a developer's workflow.
  </>}
/>
<youtubeEmbed url="https://youtu.be/fVYM10-fpG4?si=JeOx6-jN1Jin-W0n" description="Video: Let Cursor do the coding for you | Calum Simpson | SSW Rules (10 min)" />

## Powerful features that AI-Powered IDEs provide

### Code Completion

GitHub Copilot first popularized the 'code completion' feature for AI-powered IDEs. Code completion will try to guess what you are going to write, and suggest how to complete this line – saving time and effort by simply pressing 'tab'.

### Command Generation

In Cursor and Windsurf, you can hit ctrl-K (or command-K), to convert natural language to a bash command. This is very useful for when you have forgotten the exact syntax of a bash command.


<imageEmbed
  alt="Image"
  size="large"
  showBorder={false}
  figureEmbed={{
    preset: "default",
    figure: 'Cursor Command Generation (ctrl-K)',
    shouldDisplay: true
  }}
  src="/uploads/rules/best-ai-powered-ide/cursor-command-generation.gif"
/>

### Chat

Chat functionality within an AI-powered IDE adds an intelligent assistant that can offer answers and suggestions without needing to leave the IDE. Unlike generic AI tools, it allows you to add context to your question, such as a file or even codebase, which lets the AI provide more tailored solutions.

#### Specify the level of context

Within the chat for Cursor, you can specify the level of context you would like to include with your prompt. By typing the `@` character, the following menu will appear.


<imageEmbed
  alt="Image"
  size="large"
  showBorder={false}
  figureEmbed={{
    preset: "default",
    figure: 'Cursor Chat Context, opened by typing `@`',
    shouldDisplay: true
  }}
  src="/uploads/rules/best-ai-powered-ide/cursor-chat-context.png"
/>

In Cursor, the `@Web` function is very useful for any situations where recent information, or information that the model has not been trained on is needed! You can also use `@Git` to compare diffs with the main branch, to generate a nice PR summary.

### Agent

The Agent function in AI-powered IDEs represents a significant leap in a developer's workflow. It acts as a semi-autonomous coding assistant, capable of directly controlling the IDE (creating/editing files, reading the codebase, searching the web, executing bash commands).

<imageEmbed
  alt="Image"
  size="large"
  showBorder={false}
  figureEmbed={{
    preset: "badExample",
    figure: 'Bad example - Using ChatGPT with only one instruction, requiring you to copy paste the commands into the IDE',
    shouldDisplay: true
  }}
  src="/uploads/rules/best-ai-powered-ide/bad-example-chatgpt.png"
/>

<imageEmbed
  alt="Image"
  size="large"
  showBorder={false}
  figureEmbed={{
    preset: "goodExample",
    figure: 'Good example - Using Cursor Agent to create a Tina App, with multiple provided instructions',
    shouldDisplay: true
  }}
  src="/uploads/rules/best-ai-powered-ide/good-example-using-agent.png"
/>

## AI-Powered IDE Comparison

| Feature               | [Cursor](https://www.cursor.com/)                                                        | [IDE + GitHub Copilot](https://github.com/features/copilot)                                    | [Windsurf](https://codeium.com/windsurf)                                        | [GitHub Copilot Workspace](https://githubnext.com/projects/copilot-workspace) |
| --------------------- | ---------------------------------------------------------------------------------------- | ---------------------------------------------------------------------------------------------- | ------------------------------------------------------------------------------- | ----------------------------------------------------------------------------- |
| Free Version          | • 2000 completions per month• 50 slow premium requests per month                     | • 2000 completions per month• 50 chat messages per month                                   | • 5 premium user prompts• 5 premium Flow Actions                            | ❌                                                                             |
| Price (USD per month) | $20                                                                                      | $10                                                                                            | $15                                                                             | $10 (Bundled with Copilot Pro)                                                |
| AI Model(s)           | • cursor-small (free)• Anthropic Claude (Sonnet, Haiku)• OpenAI (GPT 3.5, 4, 4o) | • Anthropic Claude (Sonnet, Haiku)• OpenAI (GPT 3.5, 4, 4o)                                | • Meta Llama• Anthropic Claude (Sonnet, Haiku)• OpenAI (GPT 3.5, 4, 4o) | OpenAI (GPT 3.5, 4, 4o)                                                       |
| Custom Models         | ❌                                                                                        | ❌                                                                                              | ❌                                                                               | Enterprise Version                                                            |
| Custom Rules          | ✅                                                                                        | ✅                                                                                              | ✅                                                                               | ❌                                                                             |
| Auto-Completion       | ✅                                                                                        | ✅                                                                                              | ✅                                                                               | ✅                                                                             |
| Chat                  | ✅                                                                                        | ✅                                                                                              | ✅                                                                               | ✅                                                                             |
| Agent                 | ✅                                                                                        | ❌                                                                                              | ✅                                                                               | ✅                                                                             |
| Privacy Mode          | ✅                                                                                        | ✅                                                                                              | ✅                                                                               | ✅                                                                             |
| GitHub Integration    | ❌                                                                                        | • Copilot Chat• Auto-generate commit message                                               | ❌                                                                               | • Full Workflow is on GitHub• Generate PR Summary                         |
| Web Searching         | ✅                                                                                        | ❌                                                                                              | ✅                                                                               | ❌                                                                             |
| Supported IDE         | Cursor IDE - Forked VS Code (with VSCode Extensions Supported)                           | • Azure Data Studio• JetBrains IDEs• VS Code• Visual Studio• Neovim• Xcode | Windsurf IDE - Forked VS Code (with VSCode Extensions Supported)                | • Browser based• VSCode Support (GitHub CodeSpace)                        |

<asideEmbed
  variant="info"
  body={<>
    **Tip**: Give each of them a try – most of them have free trials, so you can see which one works best for you.

If you still have your student status, you can get **GitHub Copilot Pro for free** here: [Free GitHub Copilot Pro access](https://docs.github.com/en/copilot/how-tos/manage-your-account/getting-free-access-to-copilot-pro-as-a-student-teacher-or-maintainer#about-free-github-copilot-pro-access)
  </>}
  figureEmbed={{
    preset: "default",
    figure: 'XXX',
    shouldDisplay: false
  }}
/>


## A word of caution

AI is still very much a work in progress. It makes mistakes, especially when working with lesser-known programming languages and frameworks, and will often hallucinate. It is the developer's responsibility to ensure that the code they publish is optimized, and AI tools should only be used for assistance, and not as a direct replacement for a developer.

You wouldn't send an email written by ChatGPT without first checking it for correctness and intention. Similarly, you should not commit any code written by AI without first reading through it, and testing it.

You are solely responsible for the code you commit!

<asideEmbed
  variant="info"
  body={<>
    **Warning:** Whilst Cursor can run VSCode extensions, not all will work e.g. Microsoft licensing restricts the use of the .NET debugger to Microsoft builds of VSCode.
See <https://github.com/dotnet/vscode-csharp/wiki/Microsoft-.NET-Core-Debugger-licensing-and-Microsoft-Visual-Studio-Code>
  </>}
  figureEmbed={{
    preset: "default",
    figure: 'XXX',
    shouldDisplay: false
  }}
/>

## Which is best?

As you can see from the comparison table, each of the AI-powered IDEs rival each other in most categories, and you can't go wrong with any of them.

Currently, SSW Developers tend to prefer Cursor, and it seems to have more hype based on [Google Trends](https://trends.google.com.au/trends/explore?q=cursor%20ide,windsurf%20ide&hl=en). However, Windsurf is a formidable competitor in the battle for the best AI-powered IDE.

<asideEmbed
  variant="info"
  body={<>
    **Tip**: Investing in one of these tools may prove to be worthwhile, and you can always claim it as a tax deduction.
  </>}
  figureEmbed={{
    preset: "default",
    figure: 'XXX',
    shouldDisplay: false
  }}
/>

Share some details about your experience  with AI assisted development e.g. What tool did you use, what did you use it for, how did you use it, what was the experience like, etc.
Do you use AI tools in your prototype development?
AI‑assisted tools can turn rough ideas into working demos in hours instead of weeks. They help you scaffold codebases, generate UI from prompts or designs, and wire up data so you can validate scope and risk with clients quickly.
Video - GitHub Spark Is INSANE – I Built a Full Stack App in 12 Minutes! (10 min)Tooling Options
Here is a list of AI code generation tools:
These tools keep getting better - what they can do changes quickly.
- Github Spark (Copilot Pro+ only)GitHub Spark is an AI‑powered app builder that turns natural language instructions into full‑stack TypeScript/React apps, complete with live preview and GitHub repo integration. It’s tightly integrated with GitHub Copilot and Codespaces, making it easy to go from idea → prototype → hosted demo quickly. Spark is perfect for building end‑to‑end demos directly within the GitHub ecosystem.
- Base44 focuses on full‑stack scaffolding. By simply describing your app, it spins up CRUD operations, authentication, forms, and basic data flows. It’s particularly helpful when you need a working skeleton to show user journeys or data interactions during client presentations.
- v0 by Vercel is a UI‑focused generator that outputs production‑ready React and Tailwind components. It’s a great option when you need to iterate on design directions quickly or want to build out front‑end layouts that work seamlessly with Next.js projects.
- Firebase Studio leverages AI to help you scaffold backends, define Firestore data models, generate security rules, and create sample data. It’s ideal when your prototype needs authentication, cloud functions, and real‑time data syncing without heavy backend setup.
- Lovable focused on responsive design. It helps you generate front-end and full-stack applications that adapt seamlessly from desktop to mobile. You can start from a prompt, an image, or directly from a Figma file. It's especially useful when you need polished, responsive layouts that work across screen sizes out of the box.
- Bolt.new supports multiple frameworks beyond React, such as Vue, Svelte, and Angular. It offers terminal access for running specific commands and supports integrated deployment, so you can go from prompt (or even an image) to a live site in minutes. Ideal for quick prototyping in non-React stacks or showcasing cross-framework concepts.
- Anima specializes in turning high-fidelity designs into near pixel-perfect React, HTML, and CSS code. It integrates directly with tools like Figma, Sketch, and Adobe XD via plugins, making it easy to export real, production-grade code from your design files. It's a great choice when visual accuracy and front-end alignment with design specs are a top priority in your prototypes.
- Uizard acts like a pseudo-designer, allowing you to quickly generate multi-page UI designs from prompts or even screenshots. It supports exporting to code, making it ideal for rapid prototyping or client-facing mockups without needing full design expertise. It's especially handy for quickly visualizing product ideas or user flows in minutes.
✅ Best Use Cases for AI Tools
Rapid prototyping and design exploration
Non-technical team members can use screenshots, hand-drawn wireframes, or Figma files to create functional prototypes. These tools allow quick iteration, fast feedback, and better alignment across teams early in the design process.
Kick starting new projects
Use AI-generated code as a base to accelerate development. Many tools produce clean, component-based layouts that follow design principles and give developers a working foundation — helping teams skip repetitive boilerplate and focus on core features.
Going from idea to deployment
Some tools like v0 and base44 can take a project from wireframe to a deployed demo with minimal effort. This helps teams validate concepts with stakeholders, collect feedback, and iterate fast — bridging the gap between idea and implementation.
Replicating and reusing UI patterns
AI tools like v0 or Anima are great for extracting patterns from reference sites — e.g., navigation, pricing tables, or forms — and turning them into working components. These can be integrated into your design system, refined, and styled to meet brand or accessibility standards.
❌ What to Avoid When Using AI Tools
AI tools are great for prototypes, but they do not replace good software engineering. Here are common mistakes to avoid:
Treating prototypes as production code
AI-generated code is built for speed, not safety or scalability. It often lacks error handling, validation, and test coverage. Shipping this code directly to production can lead to security issues, crashes, and long-term maintenance problems. Always treat prototypes as drafts — they must be reviewed and hardened before deployment.
Skipping human review
AI can generate structured code, but it doesn’t understand your business logic or security standards. That’s why every AI-generated change should be reviewed — especially pull requests or multi-file edits. Never auto-merge AI output. A human eye helps catch logic bugs, performance issues, and unsafe assumptions.
Uploading real client data
Do not paste real or sensitive client data into prompts or online AI tools. Most tools process data in the cloud, and unless there’s a verified agreement in place, you risk a data breach or compliance violation. Always use fake or anonymized data during prototyping.
Ignoring licensing and attribution
Some generated content may be derived from licensed or attributed sources. Before using AI-generated code or media in a project, always verify its origin and license. This is especially important if your prototype is going to production or reused in commercial contexts.
Example of prompt and the result
I need a pricing page with 4 options in columns ending with enterprise.
I would like a toggle at the top to change from monthly to annual.
I would like it in orange, black and white.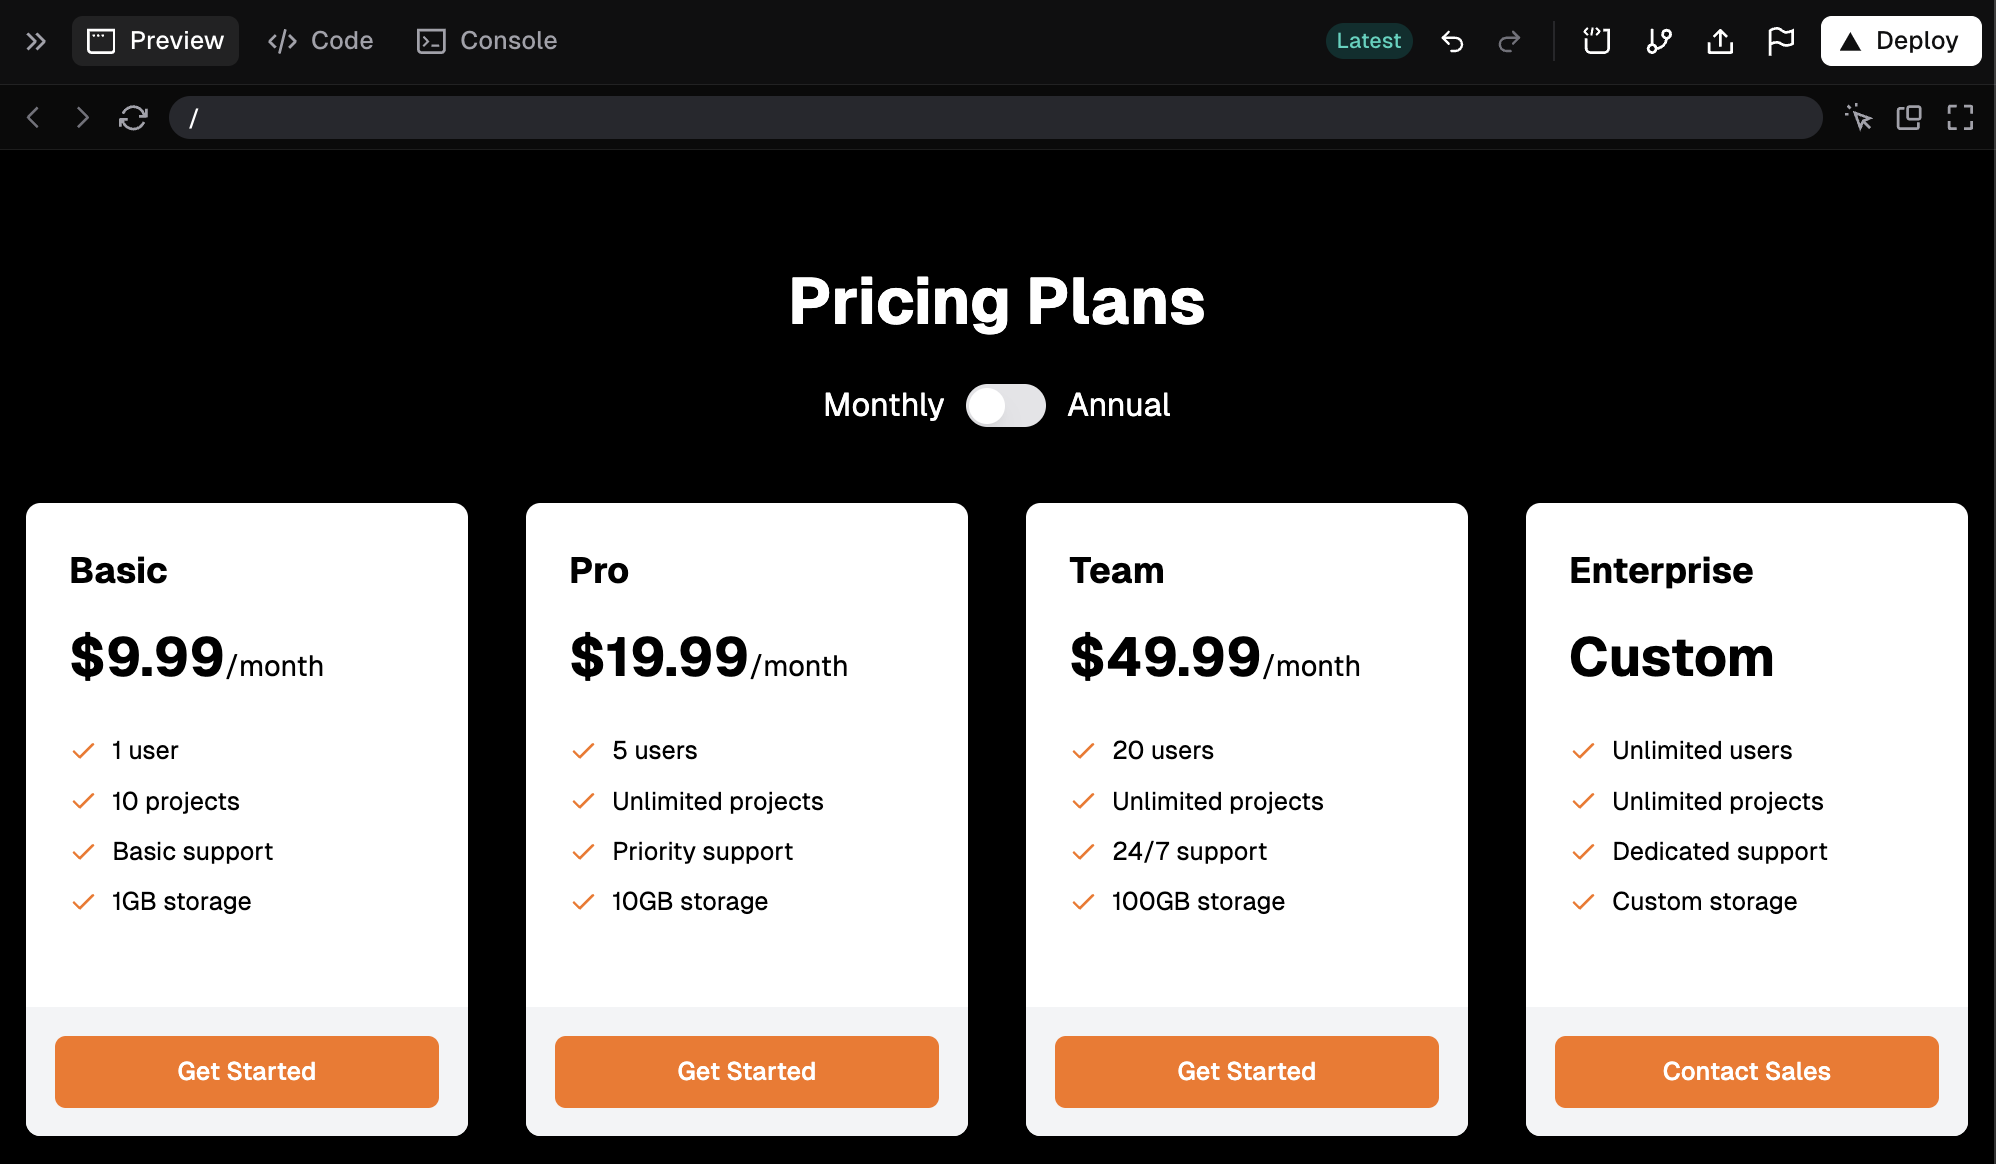
Figure: The UI generated by v0, which includes the code
Do you handle AI Hallucinations the right way?
AI is a powerful tool, however, sometimes it simply makes things up, aka hallucinates. AI hallucinations can sometimes be humorous, but it is very bad for business!
AI hallucinations are inevitable, but with the right techniques, you can minimize their occurrence and impact. Learn how SSW tackles this challenge using proven methods like clean data tagging, multi-step prompting, and validation workflows.
Let's face it. AI will always hallucinate.
AI models like GPT-4o are powerful but imperfect. They generate plausible-sounding but incorrect or nonsensical outputs (hallucinations) due to training limitations, ambiguous prompts, or flawed data retrieval. While you can’t eliminate hallucinations entirely, you can reduce their frequency and mitigate risks.
Use Clean, Tagged Data for RAG
documents = ["Sales grew 10% in 2023", "Server downtime: 5hrs in Q2"]Query: "What was the server uptime in Q2?" Hallucination: "Server uptime was 95%." (Wrong: No uptime data exists!)
❌ Figure: Bad example - Untagged, messy data leads to garbage outputs
documents = [{"text": "Sales grew 10% in 2023", "tags": ["finance", "sales"]},{"text": "Server downtime: 5hrs in Q2", "tags": ["IT", "downtime"]}]Query: "What was the server uptime in Q2?" Output: "No uptime data found. Available data: 5hrs downtime." ✅
✅ Figure: Good example - Properly tagged data reduces the risk of incorrect retrieval
Break Workflows into Multi-Step Prompts
Use a chain-of-thought approach to split tasks into smaller, validated steps
User: "Write a blog about quantum computing benefits for SMEs." AI: (Hallucinates fictional case studies and stats)
❌ Figure: Bad example - A single-step prompt invites hallucinations
User: "Generate a blog draft about quantum computing for SMEs."
"Verify all claims in this draft against trusted sources."
"Compare the final draft to the original query. Did you answer the question?"✅ Figure: Good example - Multi-step validation reduces errors
Force the AI to Justify Its Reasoning
Always prompt the AI to cite sources and flag uncertainty.
User: "Why should SMEs adopt quantum computing?" AI: "It boosts efficiency by 200%." (Source? None!)
❌ Figure: Bad example - No justification = unchecked errors
System Prompt: "Answer the question and cite sources. If uncertain, say 'I don’t know'." User: "Why should SMEs adopt quantum computing?" AI: "Quantum computing can optimize logistics (Source: IBM, 2023). However, adoption costs may be prohibitive for SMEs."
✅ Figure: Good example - Require citations and self-reflection
Validate Outputs Against the Original Question
Use a validation layer to ensure outputs align with the original query.
User: "How does Azure Kubernetes Service (AKS) simplify deployment?" AI: Explains Kubernetes basics (ignores AKS specifics).
❌ Figure: Bad example - No final check = off-topic answers
System Prompt: "Compare your answer to the user’s question. Did you address AKS?" AI: "Revised answer: AKS simplifies deployment by integrating with Azure DevOps and..." ✅
✅ Figure: Good example - Add a final validation step
Other techniques to minimize hallucinations
- Lower temperature settings: Reduce creativity (e.g.,
temperature=0.3) for factual tasks - Human-in-the-loop: Flag low-confidence responses for manual review
- Predefined constraints: Example: "Do not speculate beyond the provided data"
AI hallucinations are unavoidable, but SSW’s proven techniques, like clean data tagging, multi-step validation, and forcing justification can keep them in check. By designing workflows that anticipate errors and validate outputs, you turn a risky limitation into a manageable challenge.
Always assume hallucinations will happen, so build systems to catch them!
Do you provide an llms.txt file to make your website LLM-friendly?
As large language models (LLMs) become integral in processing and generating content, ensuring they access and interpret your website accurately is crucial. Traditional HTML structures, laden with navigation menus, advertisements, and scripts, can hinder LLMs from efficiently extracting meaningful information.
Implementing an
llms.txtfile addresses this challenge by providing a streamlined, LLM-friendly version of your site's content.Video: Do you provide an llms.txt file to make your website LLM-friendly? | Isaac Lombard | Rules (1 min)What is an
llms.txt?An
llms.txtfile is a standardized Markdown file placed at the root of your website (/llms.txt). It gives LLMs clear and organised information about your site, helping them understand and use your content better.✅ Benefits of implementing
llms.txt- Easier to read - LLMs can directly access pertinent information without sifting through extraneous HTML elements
- More accurate results - By providing clear and concise content, you reduce the risk of misinterpretation by LLMs
- Consistent format: The standardized format ensures consistency, making it easier for LLMs to process your site's data
Formatting
llms.txtAn effective
llms.txtfile includes:- Project or site name - An H1 header with the name of your project or site
- Summary - A blockquote offering a brief overview of your project, highlighting essential aspects
- Detailed information - Additional sections providing in-depth insights, such as usage guidelines or key features
- Resource links - H2 headers followed by lists of URLs to relevant Markdown files or resources
Key strategies for effective LLMO
- Investing in digital PR - Building relationships with reputable media outlets and influencers can lead to authoritative mentions, enhancing a brand's credibility in the eyes of AI systems
- Enhancing backlink profiles - Acquiring high-quality backlinks from trusted sources signals authority, increasing the likelihood of content being referenced by LLMs
- Incorporating quotable content - Embedding unique statistics, expert quotes, and proprietary insights makes content more likely to be cited by AI models seeking authoritative information
Examples
Here is a mock example of the format:
# Title> Optional description goes hereOptional details go here## Section name- [Link title](https://link_url): Optional link details## Optional- [Link title](https://link_url)Figure: Mock example of llms.txt format
Note that the "Optional" section has a special meaning - if it's included, the URLs provided there can be skipped if a shorter context is needed. Use it for secondary information which can often be skipped.
Here is what a cut down version of a llm.txt looks like:
# FastHTML> FastHTML is a python library which brings together Starlette, Uvicorn, HTMX, and fastcore's `FT` "FastTags" into a library for creating server-rendered hypermedia applications.Important notes:- Although parts of its API are inspired by FastAPI, it is *not* compatible with FastAPI syntax and is not targeted at creating API services- FastHTML is compatible with JS-native web components and any vanilla JS library, but not with React, Vue, or Svelte.## Docs- [FastHTML quick start](https://answerdotai.github.io/fasthtml/tutorials/quickstart_for_web_devs.html.md): A brief overview of many FastHTML features- [HTMX reference](https://raw.githubusercontent.com/path/reference.md): Brief description of all HTMX attributes, CSS classes, headers, events, extensions, js lib methods, and config options## Examples- [Todo list application](https://raw.githubusercontent.com/path/adv_app.py): Detailed walk-thru of a complete CRUD app in FastHTML showing idiomatic use of FastHTML and HTMX patterns.## Optional- [Starlette full documentation](https://gist.githubusercontent.com/path/starlette-sml.md): A subset of the Starlette documentation useful for FastHTML development.Figure: Excerpt of an in-use llms.txt
Directories
Here are a few directories that list the llms.txt files available on the web:
Integrations
Various tools and plugins are available to help integrate the llms.txt specification into your workflow:
- llms_txt2ctx - CLI and Python module for parsing llms.txt files and generating LLM context
- JavaScript Implementation - Sample JavaScript implementation
- vite-plugin-llms - Vite plugin that serves markdown files alongside your routes following the llms.txt specification
